<예시_1>
<!DOCTYPE html>
<html>
<head>
<meta charset="UTF-8">
<title>연산 test</title>
<script>
function plusfunc() {
var a = parseInt(frm.a.value);
var b = parseInt(frm.b.value);
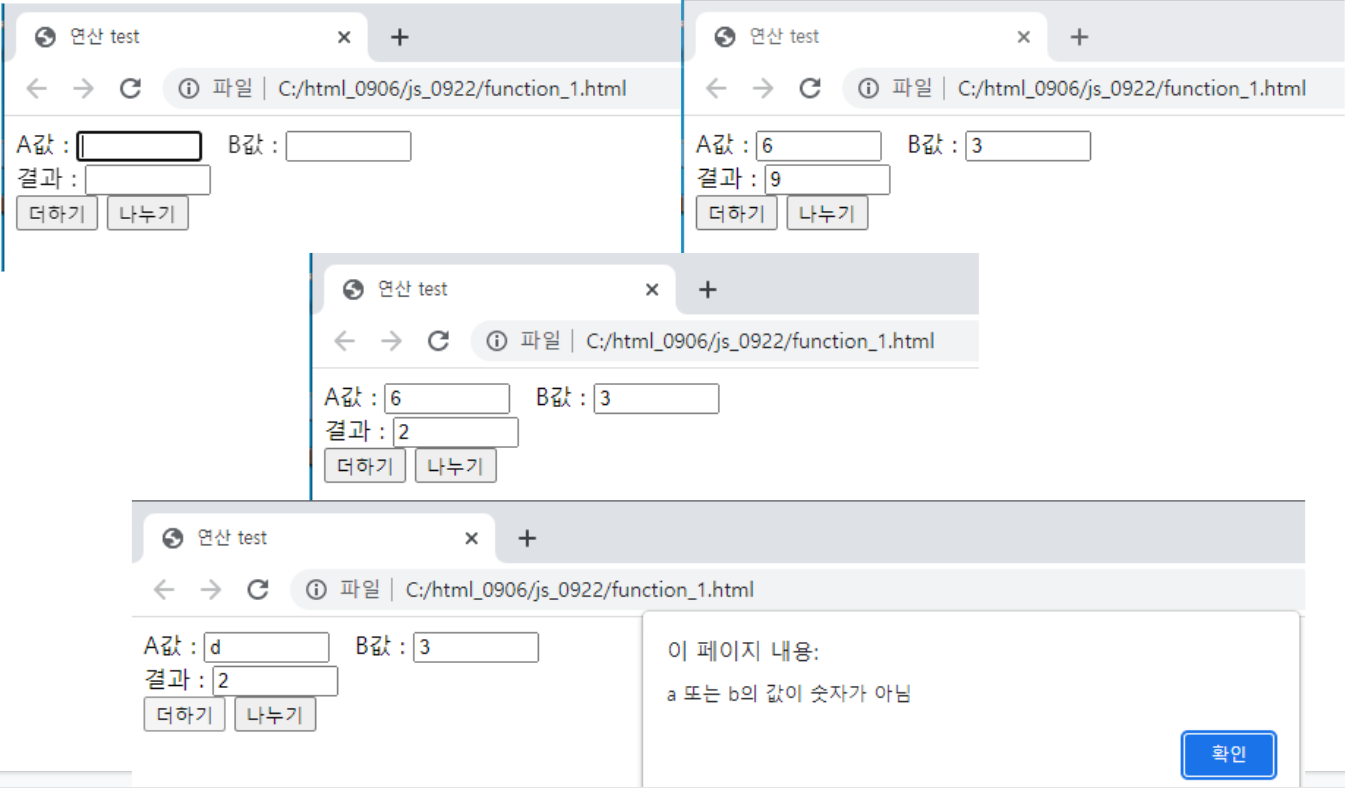
if (isNaN(a) || isNaN(b)) {
alert("a 또는 b의 값이 숫자가 아님");
frm.a.value = "";
frm.b.value = "";
frm.b.focus();
return;
}
frm.rs.value = a + b;
}
function divifunc() {
var a = Number(frm.a.value);
var b = Number(frm.b.value);
rs = a / b;
if (isFinite(rs) == false) {
// 메서드는 주어진 값이 유한수인지 판별
alert("0으로 나눌 수 없음");
frm.a.value = "";
frm.b.value = "";
frm.a.focus();
return;
}
frm.rs.value = rs;
}
</script>
</head>
<body>
<form name="frm">
A값 : <input type="text" size="7" name="a">
B값 : <input type="text" size="7" name="b"><br>
결과 : <input type="text" size="7" name="rs"><br>
<input type="button" name="+" value="더하기" onclick="plusfunc()">
<input type="button" name="/" value="나누기" onclick="divifunc()">
</form>
</body>
</html>
↓결과
Math객체
- 수학 계산을 위해 다양한 프로퍼티와 메소드 제공
- new Math()객체를 생성하지 않고 Math.프로퍼티 또는 Math.메소드로 생성
| 메소드 | 의미 |
| abs(x) | x의 절대값 리턴 |
| sin(x) | sin x값 리턴 |
| exp(x) | e의 x 제곱근 리턴 |
| pow(x,y) | x의 y제곱 값 리턴 |
| random() | 0~1 보다 작은 임의의 실수 리턴 |
| floor(x) | x보다 작거나 같은 수 중 큰 정수 리턴 소수점 이하 버림 |
| round(x) | x를 반올림한 정수 리턴 소숫점 이하 반올림 |
| ceil(x) | 인수와 같거나 큰 수중에서 가장 작은 정수 리턴 소수점 이하 올림 |
| sqrt(x) | x의 제곱근 리턴 |
| 프로퍼티 | 의미 |
| E | Euler 상수 |
| PI | 원주율 |
String 객체
- 문자열을 다루는 객체
- 단일 따옴표(' ') 또는 이중 따옴표(" ")안에 저장.
- javascript : 리터럴 사용, new 연산자로 String 객체 생성
| 메소드 | 의미 | |
| 속성 | length | 문자열 길이 리턴 |
| 문자 | big() / small() | 문자를 한단계 더 크게 / 작게 |
| blink() | 문자를 깜빡이게 설정 | |
| fontsize(size) | 문자의 크기 설정 | |
| fontcolor(color) | 문자 색상 설정 | |
| toLowerCase() / toUpperCase() | 문자를 소문자 / 대문자로 변경 | |
| anchor(#위치표시문자) | <a name=" ">와 같은 효과 | |
| link(링크할 위치) | <a href=" ">와 같은 효과 | |
| italic() | 이텔릭체 설정 | |
| strike() | 취소선 설정 |
Object 생성
- 개발자가 선언하는 새로운 객체 타입을 prototype(프로토타입)이라고 함
- new Object()로 객체 생성
자바스크립트 코어 객체 중 Object타입을 이용하면 사용자 객체 생성가능
<예시_1>
<!DOCTYPE html>
<html>
<head>
<meta charset="UTF-8">
<title>Math활용</title>
<script>
function randomInt(){ //1~9의 난수값 리턴
return Math.floor(Math.random()*9)+1;
}
</script>
</head>
<body>
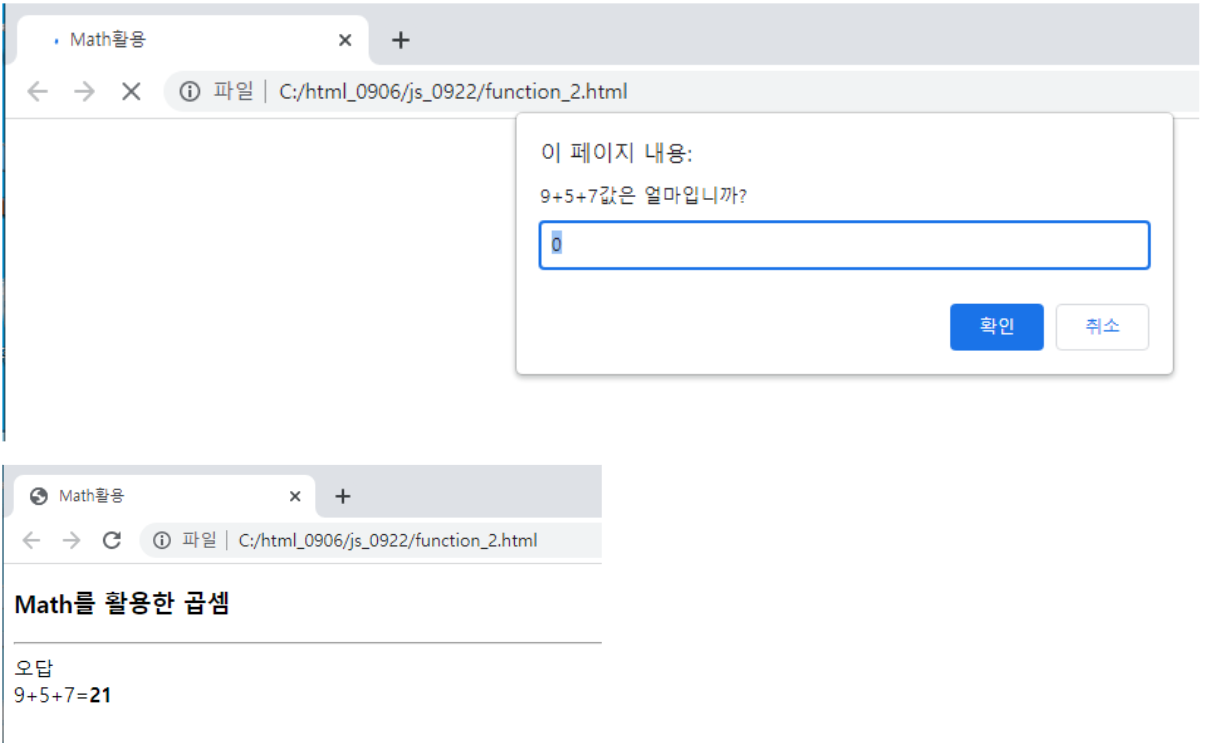
<h3>Math를 활용한 곱셈</h3>
<hr>
<script>
//곱셈 문제 생성
var ques = randomInt()+"+"+ randomInt()+"+"+randomInt();
//사용자로부터 답 입력
var user = prompt(ques+"값은 얼마입니까?",0);
if(user==null){ //취소버튼이 클릭된 경우
document.write("연습 종료");
}else{
var ans = Math.floor(eval(ques)); //구구단 정답 계산
if(ans == user)//정답과 사용자 입력 비교
document.write("정답 <br>");
else
document.write("오답 <br>");
document.write(ques +"="+"<strong>"+ans+"</stong>");
}
</script>
</body>
</html>
↓결과
<예시_2>
<!DOCTYPE html>
<html>
<head>
<meta charset="UTF-8">
<title>17의 css3 색이름 색</title>
<style>
div{
display: inline-block;
width: 80px;
padding: 20px;
}
</style>
</head>
<body>
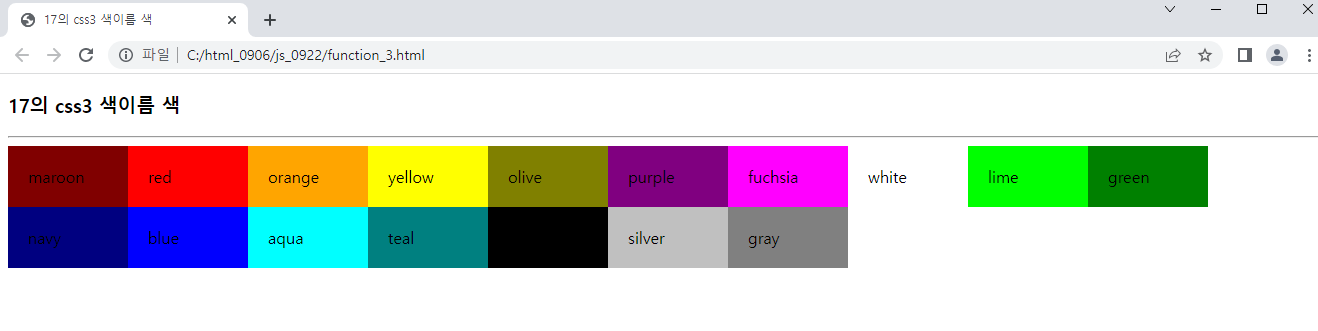
<h3>17의 css3 색이름 색</h3>
<hr>
<script>
var colorNames = [ "maroon","red", "orange","yellow", "olive",
"purple","fuchsia","white","lime","green","navy"
,"blue","aqua","teal","black","silver","gray"];
for(i=0; i<colorNames.length;i++){
var str = "<div style = 'background-color: ";
str += colorNames[i];
str += "'>"+colorNames[i]+"</div>";
document.write(str);
}
</script>
</body>
</html>
↓결과
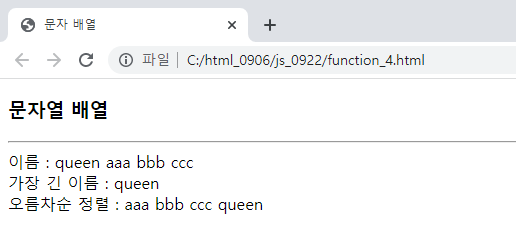
<예시_3>
<!DOCTYPE html>
<html>
<head>
<meta charset="UTF-8">
<title>문자 배열 </title>

</head>
<body>
    <h3>문자열 배열</h3>
    <hr>
    <script>
        function printArray(array){
            for(i = 0 ; i<array.length;i++)
                document.write(array[i]+" ");
            document.write("<br>");
        }
        var names = new Array("queen","aaa","bbb","ccc");

        // (1)배열의 각 이름 출력
        document.write("이름 : ");
        printArray(names);

        // (2)가장 긴 이름 출력
        var longest = names[0];
         //0번을 이미 담아둠(24번째줄)
        for(i=1;i<names.length;i++){
            if(names[i].length>longest.length)
            longest = names[i];
        }
        document.write("가장 긴 이름 : "+longest+"<br>");

        // (3)오름차순으로 출력
        names.sort();
        document.write("오름차순 정렬 : ");
        printArray(names);
    </script>
</body>
</html>
↓결과
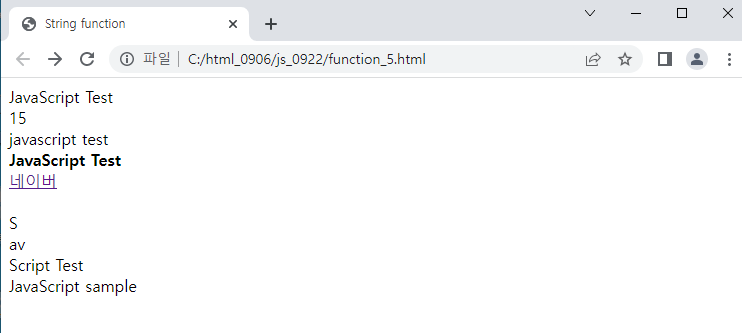
<예시_4>
<!DOCTYPE html>
<html>

<head>
    <meta charset="UTF-8">
    <title>String function</title>

</head>

<body>
    <script>
        //var data = new String("JavaScript Test"); 동일결과가 출력됨
        var data = "JavaScript Test";
        document.write(data + "<br>");

        document.write(data.length + "<br>");
        document.write(data.toLowerCase() + "<br>");
        document.write(data.bold() + "<br>");
        document.write("네이버".link('http://www.naver.com') + "<br><br>");

        document.write(data.charAt(4) + "<br>");
        document.write(data.substring(1, 3) + "<br>");
        document.write(data.substring(4) + "<br>");
        document.write(data.replace("Test", "sample") + "<br>");
    </script>
</body>

</html>
↓결과
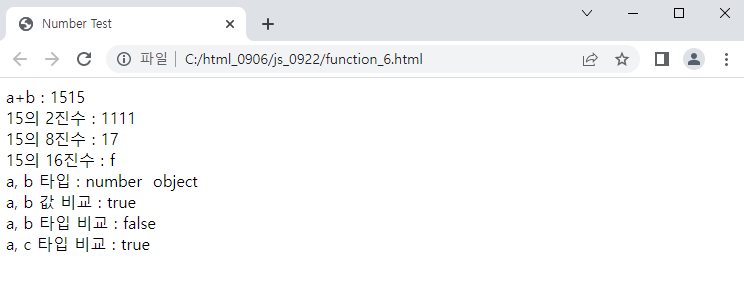
<예시_5>
<!DOCTYPE html>
<html>
<head>
<meta charset="UTF-8">
<title>Number Test</title>
</head>
<body>
<script>
var a = 15;
var b = new Number(15);
var c = 15;
document.write("a+b : "+(a.toString()+b.toString()));
document.write("<br>15의 2진수 : "+a.toString(2));
document.write("<br>15의 8진수 : "+a.toString(8));
document.write("<br>15의 16진수 : "+a.toString(16));
document.write("<br>a, b 타입 : "+typeof a+" "+typeof b);
document.write("<br>a, b 값 비교 : "+(a==b));
document.write("<br>a, b 타입 비교 : "+(a===b));
document.write("<br>a, c 타입 비교 : "+(a===c));
</script>
</body>
</html>- Equality(==, !=) : '=='을 연산 전 사용하면 피연산자들을 먼저 비교할 수 있는 형태로 변환함
== : 동등 연산자, 피연산자가 서로 다른 타입이면 타입을 강제로 변화해 비교(왼쪽을 기준으로 형변환)
예시) 254 == '254' → return true;
true ==1 → return true;
undefined == null → return true;
'abc' == new String('abc) → return true;
null == false → return false;
'true' == true → return true;
true ==2 → return false; - Identity(===, !==) : 형변환을 하지 않고 연산
=== : 일치 연산자, 두 피연산자를 더 정확히 비교
예시) 254 == '254' → return false;
true ==1 → return false;
undefined == null → return false;
'abc' == new String('abc) → return false;
↓결과
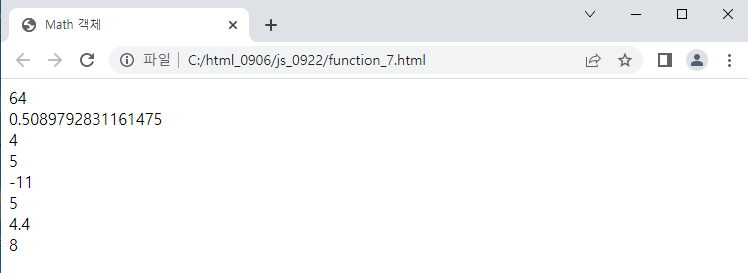
<예시_6>
<!DOCTYPE html>
<html>
<head>
<meta charset="UTF-8">
<title>Math 객체</title>

</head>
<body>
    <script>
        document.write(Math.pow(8,2)+"<br>");
        document.write(Math.random()+"<br>");
        document.write(Math.floor(4.7)+"<br>");
        document.write(Math.ceil(4.4)+"<br>");
        document.write(Math.ceil(-11.9)+"<br>");
        // Math.ceil() : 인수로 전달받은 값과 같거나 큰 수 중에서 정수값 반환

        document.write(Math.round(4.7)+"<br>");
        document.write(Math.abs(-4.4)+"<br>");
        document.write(Math.sqrt(64)+"<br>");
    </script>
</body>
</html>
↓결과
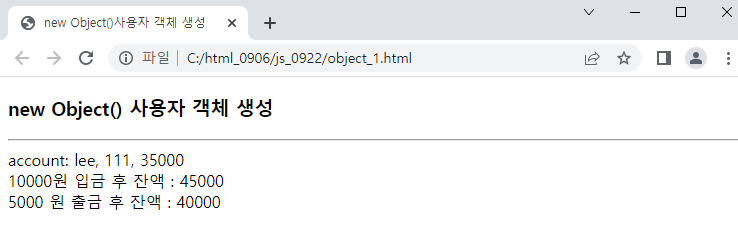
<예시_7>
방법_1)
<!DOCTYPE html>
<html>
<head>
<meta charset="UTF-8">
<title>new Object()사용자 객체 생성</title>
    <script>
        //메소드로 사용할 3개 함수
        function inquiry(){return this.balance;} //잔금조회
        function deposit(money){this.balance +=money} //money만큼 입금
        function withdraw(money){ //예금인출, money 인출하고자 하는 액수
            this.balance-=money;//money가 balance보다 작다고 가정
            return money;
        }

        //사용자 객체 만들기
        var account = new Object();
        account.owner = "lee";  //계좌 프로퍼티 생성 및 초기화
        account.code = "111";  //코드 프로퍼티 생성 및 초기화
        account.balance = 35000; //잔액 프로퍼티 생성 및 초기화
        account.inquiry = inquiry;  //메소드 작성
        account.deposit = deposit; //메소드 작성
        account.withdraw = withdraw; //메소드 작성
    </script>
</head>
<body>
    <h3>new Object() 사용자 객체 생성</h3>
    <hr>
    <script>
        //객체 활용
        document.write("account: ");
        document.write(account.owner+", ");
        document.write(account.code+", ");
        document.write(account.balance+" <br>");

        account.deposit(10000); //10000원 입금
        document.write("10000원 입금 후 잔액 : "+account.inquiry()+"<br>");

        account.withdraw(5000); //5000원 출금
        document.write("5000 원 출금 후 잔액 : "+account.inquiry());
    </script>
</body>
</html>
방법_2)
<!DOCTYPE html>
<html>
<head>
<meta charset="UTF-8">
<title>리터럴 표기법 객체 생성</title>
    <script>
        //사용자 객체 생성
        var account ={
            //프로퍼티 생성 및 초기화
            owner : "lee", //계좌
            code : "111",  //계좌 코드
            balance : 35000,  //잔액 프로퍼티

            //메소드 작성
            inquiry : function(){return this.balance;},//잔금조회
            deposit : function(money){this.balance+=money;}, //money 입금
            withdraw : function(money){ //출금
                this.balance-=money;
                return money;
                ;}
        }
    </script>
</head>
<body>
    <h3>리터럴 표기법 객체 생성</h3>
    <hr>
    <script>
         //객체 활용
         document.write("account: ");
        document.write(account.owner+", ");
        document.write(account.code+", ");
        document.write(account.balance+" <br>");

        account.deposit(10000); //10000원 입금
        document.write("10000원 입금 후 잔액 : "+account.inquiry()+"<br>");

        account.withdraw(5000); //5000원 출금
        document.write("5000 원 출금 후 잔액 : "+account.inquiry());
    </script>
</body>
</html>
방법_3)
<!DOCTYPE html>
<html>
<head>
<meta charset="UTF-8">
<title>Account프로토타입 생성</title>
    <script>
        //프로토타입 생성 : 생성자 함수 작성
        function Account(owner, code, balance){
            //프로퍼티 생성
            this.owner = owner;
            this.code = code;
            this.balance = balance;

            //메소드 생성
            this.inquiry = function(){return this.balance;}
            this.deposit = function(money){this.balance+=money;}
            this.withdraw = function(money){
                this.balance-=money;
                return money;
            }
        }
    </script>
</head>
<body>
    <h3>Account프로토타입 생성</h3>
    <hr>
    <script>
        //new연산자를 이용한 계좌 객체 생성
        var account = new Account("lee","111",35000);

         //객체 활용
         document.write("account: ");
        document.write(account.owner+", ");
        document.write(account.code+", ");
        document.write(account.balance+" <br>");

        account.deposit(10000); //10000원 입금
        document.write("10000원 입금 후 잔액 : "+account.inquiry()+"<br>");

        account.withdraw(5000); //5000원 출금
        document.write("5000 원 출금 후 잔액 : "+account.inquiry());
    </script>
</body>
</html>
↓방법_1, 방법_2, 방법_3 동일결과
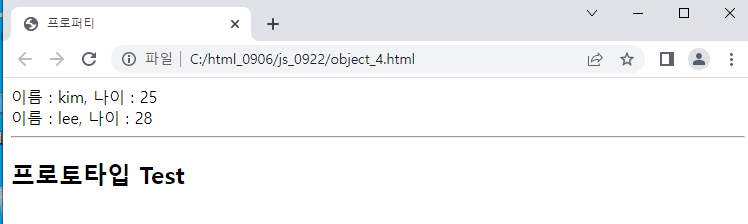
<예시_8>
<!DOCTYPE html>
<html>
<head>
<meta charset="UTF-8">
<title>프로퍼티</title>
    <script>
        //생성자 함수
        function User(name, age){
            this.name = name;
            this.age = age;
            this.view = function(){ //메소드
                document.write("이름 : "+name+", 나이 : "+this.age+"<br>");
            };
        }
        //인스턴스 생성
        var ob1 = new User('kim',25);
        var ob2 = new User('lee',28);
        ob1.view();
        ob2.view();
    </script>
</head>
<body>
    <hr>
    <h2>프로토타입 Test</h2>

</body>
</html>
↓결과
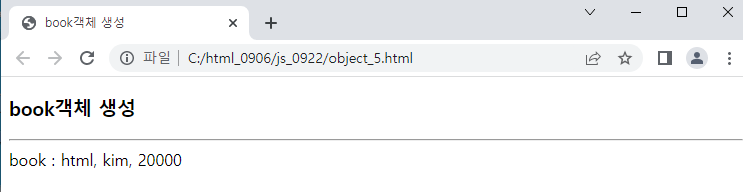
<예시_9>
<!DOCTYPE html>
<html>
<head>
<meta charset="UTF-8">
<title>book객체 생성</title>

</head>
<body>
    <h3>book객체 생성</h3>
    <hr>
    <script>
        //book객체 생성
        var book = new Object();
        book.title="html";
        book.author="kim";
        book.price = 20000;

        book.view = function(){
            document.write("book : ");
            document.write(this.title+", ");
            document.write(this.author+", ");
            document.write(this.price);
        }
        book.view();
    </script>
</body>
</html>
↓결과
DOM(Document Object Model)
- 문서 객체 모델은 document와 관련된 집합
- 목적 : html페이지가 출력된 후, dom객체를 통해 html태그가 출력된 모양과 컨텐츠를 제어하기 위해
- 문서 객체 모들을 사용해 html페이지에 태그를 추가, 제거, 수정가능(html, XML, 사용자 정의)
- document객체 요소를 추출하는 메소드 선택자
1. 원거리 선택자 : 요소 속석명으로 선택
2. 근거리 선택자 : 가까이에 있는 요소를 선택
| 메소드 | 의미 |
| getElementById("id명") | 태그의 id명이 일치하는 문서 객체를 가져오는 선택자 |
| getElementByName("name명") | 태그의 name명이 일치하는 문서 객체를 가져오는 선택자 |
| getElementByTagName("tag명") | 태그의 tag명이 일치하는 문서 객체를 가져오는 선택자 |
- 웹 브라우저는 로드하는 과정에서 html태그를 하나의 객체로 생성(개체화)
→ html DOM 객체(W3C의 표준이므로 모든 브라우저 호환가능) - DOM 객체 구성요소
html 태그의 5가지 요소(element)
1. 태그(element) 명 : <p></p>
2. 이름 : id
3. css3 style : style
4. 이벤트 리스너 : onclick
5. 컨텐츠 : 태그와 태그 사이의 요소 - property : DOM객체의 멤버 변수로써 html태그 element반영
- method : DOM객체의 멤버 변수로써, html태그 제어하는데 활용
- collection : 정보집합적으로 표현하는 일종의 배열
- event listener : 자바스크립트 코드를 이용해 직접 DOM객체에 이벤트 리스터 등록
- CSS3 style : style 프로퍼티를 통해 html 태그에 적용된 css3스타일시트에 접근 가능
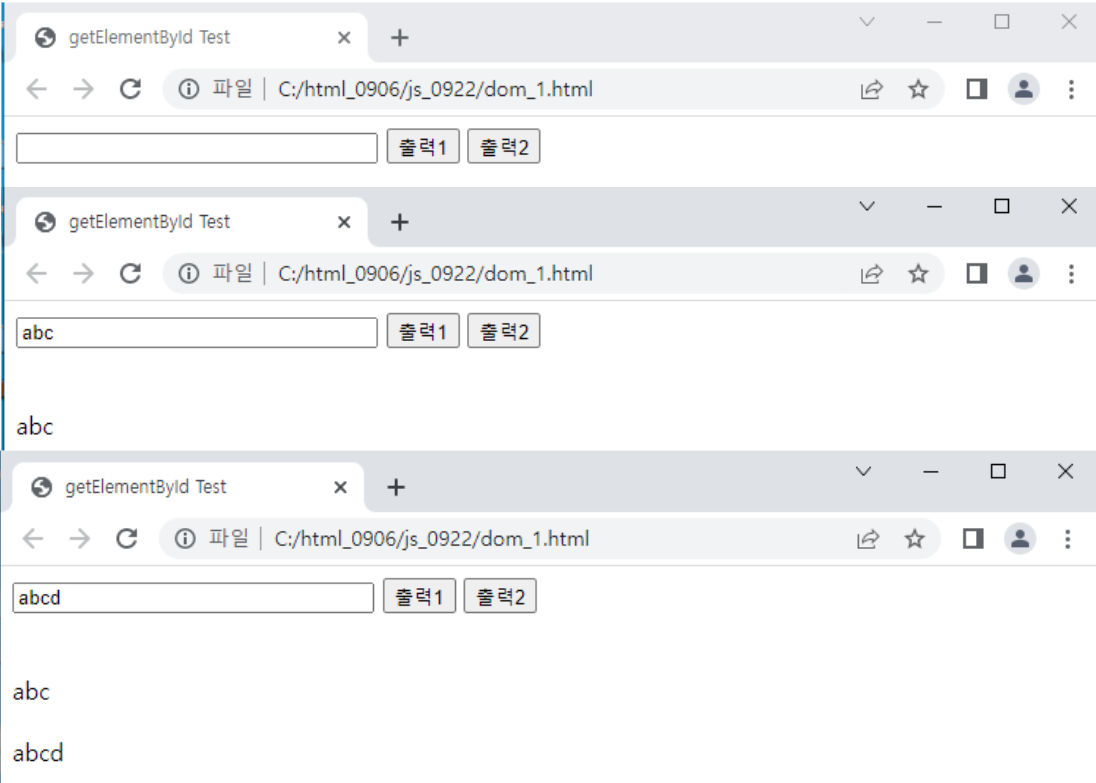
<예시_1>
<!DOCTYPE html>
<html>
<head>
<meta charset="UTF-8">
<title>getElementById Test</title>
    <script>
        function process1(){
            var ob = document.getElementById("txt").value;
            document.getElementById("view1").innerText=ob;
        }
        function process2(){
            var ob = document.querySelector("#txt").value;
            document.querySelector("#view2").innerText=ob;
        }

    </script>
</head>
<body>
    <input type="text" name="text" id="txt" size="30">
    <input type="button" value="출력1" onclick="process1()">
    <input type="button" value="출력2" onclick="process2()">
    <br><br><br>
    <div id="view1"></div><br>
    <div id="view2"></div><br>
</body>
</html>
↓결과
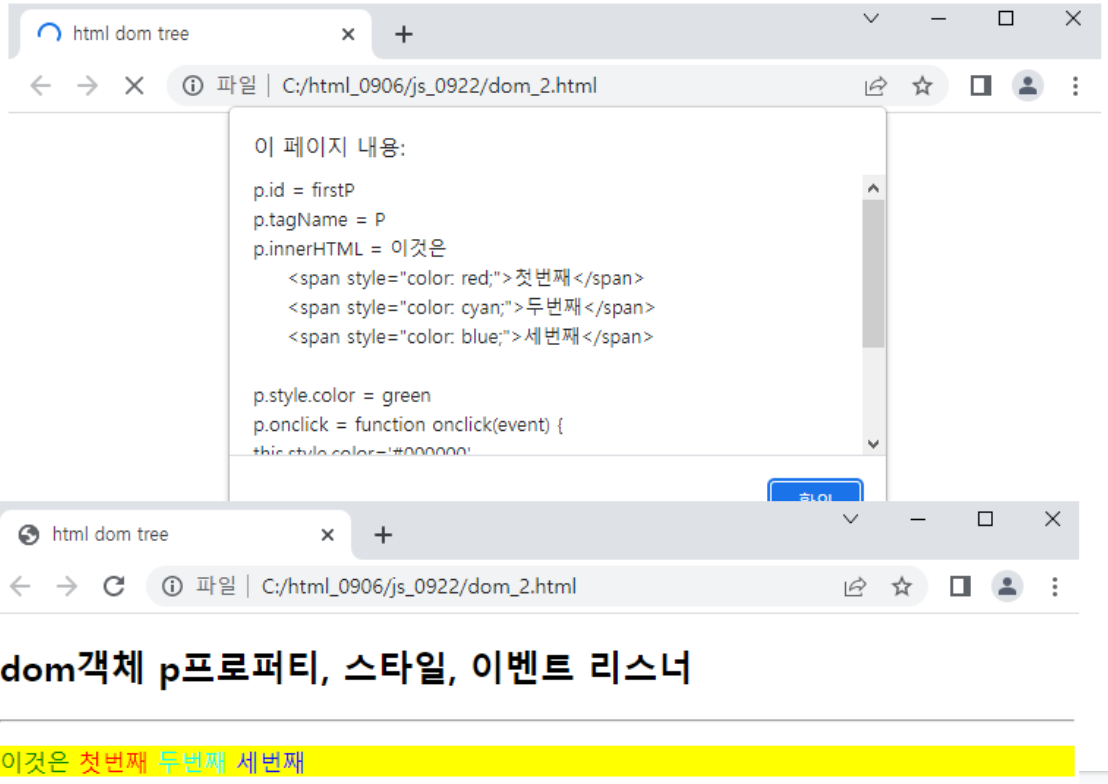
<예시_2>
<!DOCTYPE html>
<html>
<head>
<meta charset="UTF-8">
<title>html dom tree</title>

</head>
<body>
    <h2>dom객체 p프로퍼티, 스타일, 이벤트 리스너</h2>
    <hr>
    <p id="firstP" style="color : green; background:yellow"
     onclick="this.style.color='#000000'">이것은
     <span style="color: red;">첫번째</span>
     <span style="color: cyan;">두번째</span>
     <span style="color: blue;">세번째</span>
    </p>
    <script>
        var p = document.getElementById("firstP");
        var text = "p.id = "+p.id+"\n";
        text += "p.tagName = "+p.tagName+"\n";
        text += "p.innerHTML = "+p.innerHTML+"\n";
        text += "p.style.color = "+p.style.color+"\n";
        text += "p.onclick = "+p.onclick+"\n";
        text += "p.childElementCount = "+p.childElementCount+"\n";
        text += "너비 = "+p.offsetWidth+"\n";
        text += "높이 = "+p.offsetHeight+"\n";
        alert(text);
    </script>
</body>
</html>
↓결과
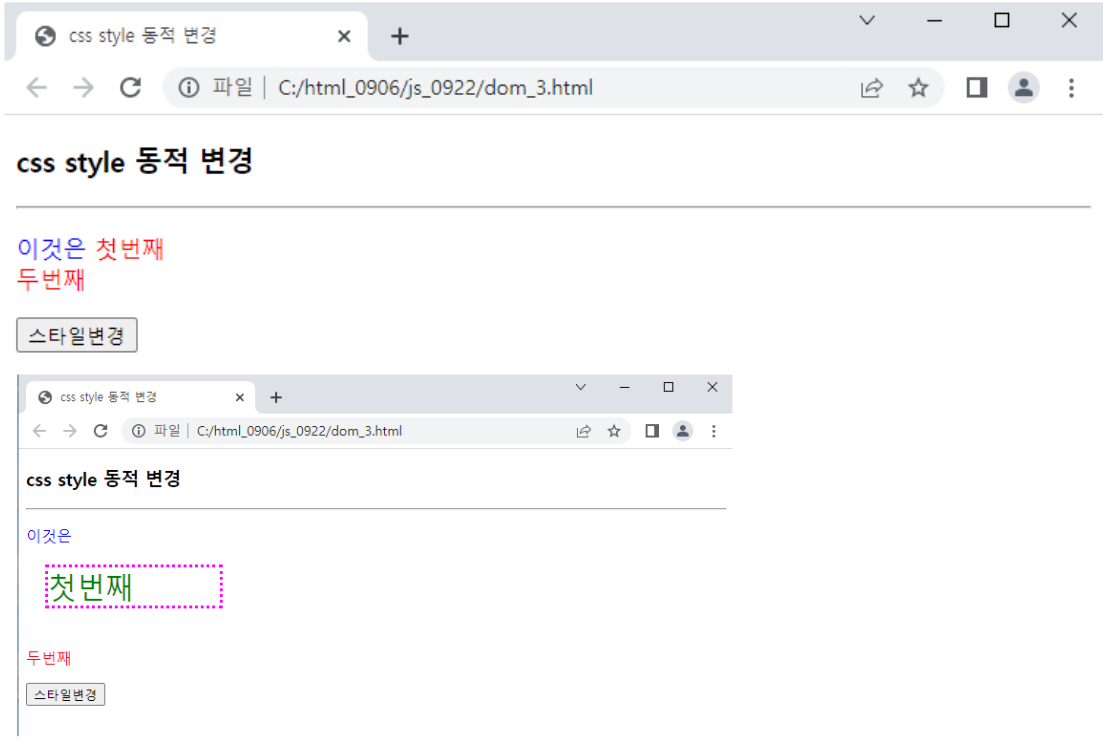
<예시_3>
<!DOCTYPE html>
<html>

<head>
    <meta charset="UTF-8">
    <title>css style 동적 변경</title>
    <script>
        function change() {
            var span1 = document.getElementById("mySpan1");//id=mySpan1찾기
            span1.style.color = "green";
            span1.style.fontSize = "30px";
            span1.style.display = "block";
            span1.style.width = "6em";
            span1.style.border = "3px dotted magenta";
            span1.style.margin = "20px";

        }
    </script>
</head>

<body>
    <h3>css style 동적 변경</h3>
    <hr>
    <p style="color : blue">이것은
        <span id="mySpan1" style="color : red">첫번째</span><br>
        <span id="mySpan2" style="color : red">두번째</span>

    </p>
    <input type="button" value="스타일변경" onclick="change()">
</body>

</html>
↓결과
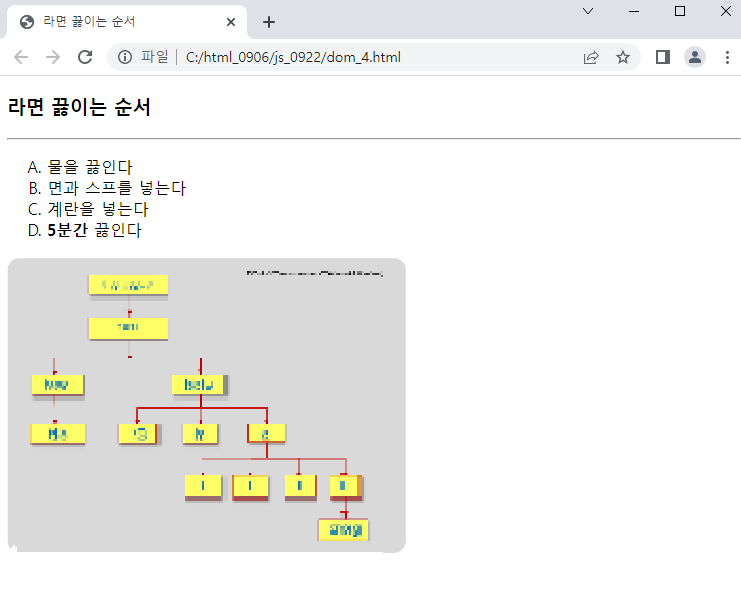
<예시_4>
<!DOCTYPE html>
<html>
<head>
<meta charset="UTF-8">
<title>라면 끓이는 순서</title>

</head>
<body>
    <h3>라면 끓이는 순서</h3>
    <hr>
    <ol type="A">
        <li>물을 끓인다</li>
        <li>면과 스프를 넣는다</li>
        <li>계란을 넣는다</li>
        <li><strong> 5분간</strong> 끓인다</li>
    </ol>
    <img src="../images/8-1DOMTree.PNG" width="400" height="300" alt="dom tree">
</body>
</html>
↓결과
'UI > JavaScript' 카테고리의 다른 글
| 220926_JavaScript_국비_BOM (1) | 2022.09.26 |
|---|---|
| 220923_JavaScript_국비_DOM2 (2) | 2022.09.23 |
| 220921_JavaScript_국비_내장함수/ 객체/ Array (2) | 2022.09.21 |
| 220920_JavaScript_국비_식& 연산자/ if~else/switch/for/while/do~while/function (2) | 2022.09.20 |
| 220919_JavaScript_국비_코드위치/ 데이터 타입/ 변수 & 상수/ 식& 연산자 (2) | 2022.09.19 |


