
Response
- 내장 객체 response는 서버가 클라이언트에게 요청에 대한 응답을 보내기 위한 객체
- 내장객체 response의 자료 유형인 HttpServletResponse는 상위 인터페이스로 ServletResponse를 가짐
- 메소드종류
| 반환값 | 메소드 | 사용 용도 |
| void | addCookid(Cookie cookie) | 쿠키 데이터 기록 |
| void | addHeader(String name, String value) | response 헤더 내용 기록 |
| void | sendRedirect(String location) | 지정된 location 페이지로 이동 |
| void | setBufferSize(int size) | 버퍼크기 지정 |
| void | setContentType(String type) | Content type 지정 |
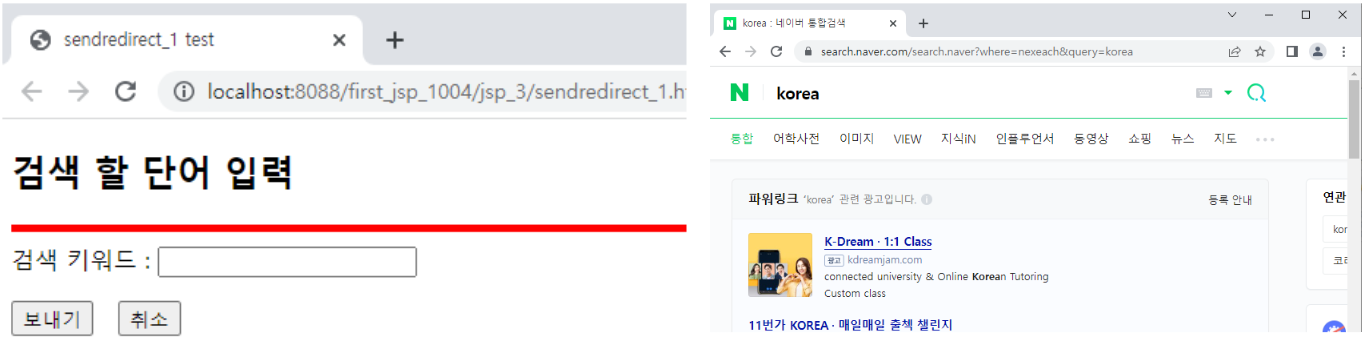
<예시_1_1>
sendredirect_1.html 파일 생성)
<!DOCTYPE html>
<html>
<head>
<meta charset="UTF-8">
<title>sendredirect_1 test</title>
</head>
<body>
<h2>검색 할 단어 입력</h2>
<hr size="5" color="red">
<form action="sendredirect_1.jsp" method="get">
검색 키워드 : <input type="text" name="word">
<p>
<input type="submit" value="보내기"> <input
type="reset" value="취소">
</form>
</body>
</html>form method종류
- get 방식 : 보안이 약함, 입력값이 주소에 보임, 기본값
- post 방식 : 입력값이 주소에 보이지 않음
sendredirect_1.jsp 파일 생성)
<%@ page language="java" contentType="text/html; charset=UTF-8"
	pageEncoding="UTF-8"%>
<!DOCTYPE html>
<html>
<head>
<meta charset="UTF-8">
<title>sendredirect_1.jsp test</title>
</head>
<body>
	<hr size="5" color="green">
	<%
	String URL = "http://search.naver.com/search.naver?where=nexeach";
	String keyword = request.getParameter("word");

	URL += "&" + "query=" + keyword;
	response.sendRedirect(URL);
	%>
</body>
</html>
↓결과
<예시_1_2>
예시_1_1에서 사이트 선택 버튼을 생성 후 각 사이트에 연결
sendredirect_1.html 파일 생성)
<!DOCTYPE html>
<html>
<head>
<meta charset="UTF-8">
<title>sendredirect_1 test</title>
</head>
<body>
<h2>검색 할 단어 입력</h2>
<hr size="5" color="red">
<form action="sendredirect_1.jsp" method="get">
검색 키워드 : <input type="text" name="word">
<!--라디오 버튼으로 사이트 선택
<p>
사이트 선택 : 구글 <input type="radio" name="site" value="google" checked="checked">
네이버 <input type="radio" name="site" value="naver">
다음 <input type="radio" name="site" value="daum">
-->
<!--select로 사이트 선택 -->
<p>
사이트 선택 : <select name="site">
<option selected="selected" value="google">구글</option>
<option value="naver">네이버</option>
<option value="daum">다음</option>
</select>
<p>
<input type="submit" value="보내기"> <input
type="reset" value="취소">
</form>
</body>
</html>
sendredirect_1.jsp 파일 생성)
<%@ page language="java" contentType="text/html; charset=UTF-8"
	pageEncoding="UTF-8"%>
<!DOCTYPE html>
<html>
<head>
<meta charset="UTF-8">
<title>sendredirect_1.jsp test</title>
</head>
<body>
	<hr size="5" color="green">
	<%
	String site = request.getParameter("site");

	if(site.equalsIgnoreCase("google")){
		String URL = "https://www.google.co.kr/search?";
		String keyword = request.getParameter("word");

		URL += "q" + "=" + keyword;
		response.sendRedirect(URL);
	}else if(site.equalsIgnoreCase("naver")){
		String URL1 = "http://search.naver.com/search.naver?where=nexeach";
		String keyword1 = request.getParameter("word");

		URL1 += "&" + "query=" + keyword1;
		response.sendRedirect(URL1);
	}else{
		String URL2 = "http://search.daum.net/search?nil_suggest=btn&w=tot&DA=SBC&";
		String keyword2 = request.getParameter("word");

		URL2 += "q" + "=" + keyword2;
		response.sendRedirect(URL2);
	}
	%>
</body>
</html>
↓라디오 버튼 결과

↓selected 결과

<예시_2>
<%@ page language="java" contentType="text/html; charset=UTF-8"
	pageEncoding="UTF-8"%>
<!DOCTYPE html>
<html>
<head>
<meta charset="UTF-8">
<title>out test</title>
</head>
<body>
	<%
	out.print("이 부분은 출력되지 않습니다");
	out.clear(); //버퍼 내용 제거
	%>

	<h2>현재 페이지의 출력 버퍼의 상태</h2>
	초기 출력 버퍼의 크기 :
	<%=out.getBufferSize()%>
	byte
	<p>
		남은 출력 버퍼의 크기 :
		<%=out.getRemaining()%>
		byte
	<p>

		autoFlush :
		<%=out.isAutoFlush()%>
</body>
</html>
out.clear() : 버퍼 내용 삭제
↓결과

<예시_3>
<%@ page language="java" contentType="text/html; charset=UTF-8"
    pageEncoding="UTF-8"%>
<!DOCTYPE html>
<html>
<head>
<meta charset="UTF-8">
<title>autoflush test</title>
</head>
<body>
<%@ page autoFlush="false" buffer="1kb" %>
<h2>현재 autoFlush = <%=out.isAutoFlush() %></h2><p>
<%
	for(int i =1 ; i<25;i++){
		out.println("남은 출력 버퍼의 크기(getRemaining()) : "+out.getRemaining()+"<br>");

		//autoFlush가 false이면 사용자가 버퍼 처리 필수
		if(out.getRemaining()<50){  //버퍼가 50이하면 비우는 if문
			out.println("<br");
			out.flush();  //현재 출력 버퍼에 저장되어 있는 내용을
			                //웹 브라우저에 전송하고 비움
		}
	}
%>
<hr size="5" color="green">
	초기 출력 버퍼의 크기 : <%=out.getBufferSize()%> byte
	<p>
		남은 출력 버퍼의 크기 :	<%=out.getRemaining()%>	byte
</body>
</html>
↓결과

<예시_4>
bufferoverflow.jsp 파일 생성)
<%@ page language="java" contentType="text/html; charset=UTF-8"
	pageEncoding="UTF-8"%>
<!DOCTYPE html>
<html>
<head>
<meta charset="UTF-8">
<title>bufferoverflow test</title>
</head>
<body>
//버퍼용량을 키우거나 for의 출력버퍼의 크기를 줄이면 예외가 뜨지 않음
	<%@ page autoFlush="false" buffer="1kb" errorPage="error.jsp"%>

	<%
	for (int i = 1; i < 75; i++) {
		out.println("남은 출력 버퍼의 크기 : " + out.getRemaining() + "<br>");
	}
	%>
</body>
</html>
error.jsp 파일 생성)
<%@ page language="java" contentType="text/html; charset=UTF-8"
    pageEncoding="UTF-8"%>
<!DOCTYPE html>
<html>
<head>
<meta charset="UTF-8">
<title>exception test eooro.jsp</title>
</head>
<body>
<%@ page isErrorPage="true" %>
<h1>예외처리 페이지</h1>
<hr size="5" color="red">
오류문자열 [exception.toString()] : <%=exception.toString() %><br>
오류메시지 [exception.getMessage()] : <%=exception.getMessage() %>
</body>
</html>
↓결과

application
- 내장 객체 application은 javax.servlet.ServletContext의 인터페이스 자료 유형으로 웹 어플리케이션에서 유지 관리되는 여러 환경 정보 관리
→ 웹 어플리케이션 : 여러개의 서블릿과 jsp로 구성되는 웹 서비스 응용 프로그램 단위 - 서블릿과 서버간의 자료를 교환하는 메소드 종류
| 반환값 | 메소드 | 사용 용도 |
| String | getServerInfo | jsp 컨테이너의 이름과 버전 반환 |
| Object | getAttribute(String name) | 웹 응용 프로그램에서 지정된 이름의 속성 반환 |
| void | log(String msg) | 지정된 msg 로그 저장 |
| void | setAttribute(String name, Object object) | 웹 응용에서 지정된 이름으로 object를 저장 |
| void | removeAttribute(String name) | 웹 응용에서 지정된 이름의 속성 삭제 |
<예시_1>
<%@ page language="java" contentType="text/html; charset=UTF-8"
    pageEncoding="UTF-8"%>
<!DOCTYPE html>
<html>
<head>
<meta charset="UTF-8">
<title>application_1.jsp test</title>
</head>
<body>
<%!
	int application =0;
	int count =0;
%>
<%
	String scount= (String)application.getAttribute("count");

	if(scount!= null){
		count = Integer.parseInt(scount);
	}else{
		count=0;
	}
	application.setAttribute("count", Integer.toString(++count));
	application.log("현재까지의 조회 수 : "+count);
%>

	서버 컨테이너 정보 : <%=application.getServerInfo() %><p>
	현재 조회 수 누적 : <%=count %>
</body>
</html>
브라우저를 2개이상 생성할 경우 : 누적 숫자 공유함
↓결과


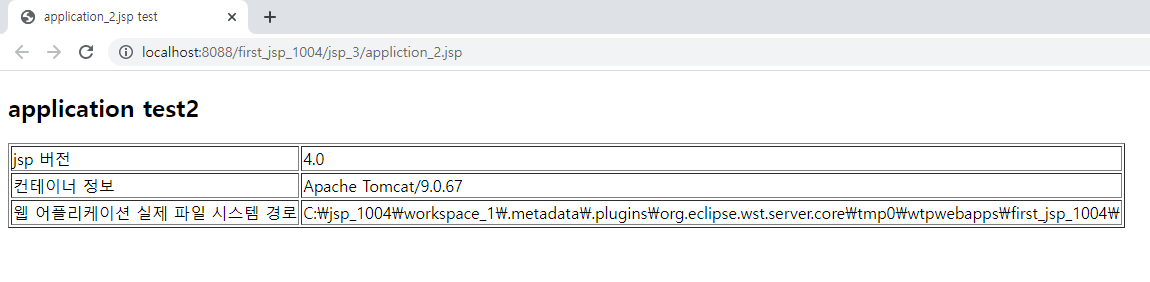
<예시_2>
<%@ page language="java" contentType="text/html; charset=UTF-8"
    pageEncoding="UTF-8"%>
<!DOCTYPE html>
<html>
<head>
<meta charset="UTF-8">
<title>application_2.jsp test</title>
</head>
<body>
<h2>application test2</h2>
	<table border="1">
		<tr>
			<td>jsp 버전</td>
			<td><%=application.getMajorVersion() %>.<%=application.getMinorVersion() %></td>
		</tr>
		<tr>
			<td>컨테이너 정보</td>
			<td><%=application.getServerInfo() %></td>
		</tr>
		<tr>
			<td>웹 어플리케이션 실제 파일 시스템 경로</td>
			<td><%=application.getRealPath("/") %></td>
		</tr>
	</table>
</body>
</html>
↓결과
pageContext
- 내장 객체 pageContext는 자료유형 클래스 javax.servlet.PageContext로 jsp페이지에 관한 정보와 다른 페이지로 제어권을 넘겨줄 때 이용하는 메소드 제공
| 반환값 | 메소드 | 사용용도 |
| void | forward(String) | 다른 서블릿 또는 jsp로 요청을 이동 |
| void | include(String) | 지정된 페이지를 현재 위치에 삽입 |
| Exception | getException() | Exception객체 반환 |
| Object | getPage() | page 객체 반환 |
| HttpSession | getSession() | HttpSession 객체 반환 |
- 포워드 방식 : 요청과 응답에 대한 제어권을 다른 페이지로 넘기더라도 브라우저에 표시되는 주소가 유지되는 방식
- 리다이렉트 방식 : 브라우저에 표시되는 주소가 바뀌는 방식
특징 : 이동 할 페이지로 요청과 응답 객체로 새로 생성해 전송 → 요청 정보와 응답정보가 유지 되지 않음 - 태그 forward : page속성에 지정된 페이지로 제어가 넘어가면 이동된 페이지에서 실행 종료됨
- 태그 include : page속성에 지정된 페이지의 처리가 끝나면 다시 현재의 페이지로 돌아와 처리를 진행해 나감
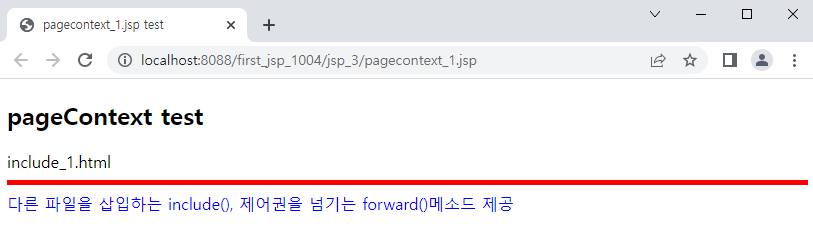
<예시_1>
pagecontext_1.jsp 파일 생성)
<%@ page language="java" contentType="text/html; charset=UTF-8"
    pageEncoding="UTF-8"%>
<!DOCTYPE html>
<html>
<head>
<meta charset="UTF-8">
<title>pagecontext_1.jsp test</title>
</head>
<body>
<h2>pageContext test</h2>
<% pageContext.getOut().println("include_1.html"); %>
<!-- out은 pageContext에 상속되어있는 객체 / 같은의미 -->
<!--<% out.println("include_1.html"); %>  -->

<hr size="5" color="red">
<% pageContext.include("include_1.html"); %>
</body>
</html>
include_1.html 파일 생성)
<!DOCTYPE html>
<html>
<head>
<meta charset="UTF-8">
<title>include_1.html test</title>
</head>
<body>
	<font color="blue">
		다른 파일을 삽입하는 include(),
		제어권을 넘기는 forward()메소드 제공
	</font>
</body>
</html>
↓결과
<예시_2>
pagecontext_2.jsp 파일 생성)
<%@ page language="java" contentType="text/html; charset=UTF-8"
    pageEncoding="UTF-8"%>
<!DOCTYPE html>
<html>
<head>
<meta charset="UTF-8">
<title>pagecontext_2.jsp test</title>
</head>
<body>
<%
	pageContext.forward("pagecontext_3.jsp");

%>
</body>
</html>
forward() : 현재 페이지의 요청과 응답에 관한 제어권을 URL로 지정된 주소로 영구적으로 넘김
forward된 페이지의 요청 처리가 종료되면 응답도 종료됨
pagecontext_3.jsp 파일 생성)
<%@ page language="java" contentType="text/html; charset=UTF-8"
    pageEncoding="UTF-8"%>
<!DOCTYPE html>
<html>
<head>
<meta charset="UTF-8">
<title>pagecontext_3.jsp test</title>
</head>
<body>
<%
	pageContext.include("pagecontext_4.jsp");
%>
<h2>pageContext의 forward메소드로 forwarding된 페이지입니다</h2>
</body>
</html>
pagecontext_4.jsp 파일 생성)
<%@ page language="java" contentType="text/html; charset=UTF-8"
	pageEncoding="UTF-8"%>
<!DOCTYPE html>
<html>
<head>
<meta charset="UTF-8">
<title>pagecontext_4.jsp test</title>
</head>
<body>
	<hr size="5" color="red">
	<h3>include되는 pagecontext_4.jsp 페이지입니다</h3>
	<hr size="5" color="green">
</body>
</html>
↓결과

액션 태그
- XML 스타일의 태그로 기술하며 특정한 동작기능 수행
- '<'와 접두어 jsp: 를사용
| 태그종류 | 태그 형식 | 사용용도 |
| include | <jsp:include page="test.jsp" /> | 현재 jsp페이지에 다른페이지 삽입(결과 삽입) |
| param | <jsp:include page = "text.jsp"> <jsp: param name ="id value="korea" /> </jsp: include> |
|
| forward | <jsp:forward page="test.jsp" /> | 현재 jsp 페이지의 제어를 다른 페이지에 전달 |
| param | <jsp:forwad page = "text.jsp"> <jsp: param name ="id value="korea" /> </jsp: forward> |
|
| plugin | <jsp:plugin type="applet" code="test" /> | 자바 애플릿 등을 플러그인 |
| useBean | <jsp:useBean id="login" class="LoginBean" /> | 자바빈즈 사용 |
| setProperty | <jsp:setProperty name="login" property="pass" /> |
자바빈즈 속성을 지정하는 메소드 호출 |
| getProperty | <jsp:getProperty name="login" property="pass" /> |
자바빈즈 속성을 반환하는 메소드 호출 |
<예시_1>
include_1.jsp 파일 생성)
<%@ page language="java" contentType="text/html; charset=UTF-8"
    pageEncoding="UTF-8"%>
<!DOCTYPE html>
<html>
<head>
<meta charset="UTF-8">
<title>include_1.jsp test</title>
</head>
<body>
	<% int i=12; %>
	<% int nn=365; %>
	<% int days=365; %>

	1년 : <%=i %> 달<p>
	<!-- include는 소스코드 삽입/ 변수 중복 사용하면 에러-->
	<%-- <%@ include file="includesub.jsp" %><p>--%>
	<!-- jsp:include는 결과만 삽입/ 변수 중복 허용 -->
	<jsp:include page="includesub.jsp" /> <p>

	1년 : <%= days %>일<p>
	1년 : <%= nn %>일<p>
</body>
</html>
includesub.jsp 파일 생성)
<%@ page language="java" contentType="text/html; charset=UTF-8"
    pageEncoding="UTF-8"%>
<!DOCTYPE html>
<html>
<head>
<meta charset="UTF-8">
<title>includesub.jsp test</title>
</head>
<body>
<%
	int nn=52;
%>
<hr size="5" color="orange">
<font color="green" size="10">
	1년 : <%=nn %> 주
</font>
</body>
</html>
↓결과

<예시_2>
login_1.html 파일 생성)
<!DOCTYPE html>
<html>
<head>
<meta charset="UTF-8">
<title>login test</title>
</head>
<body>
<h2>로그인</h2>
<form action="login_1.jsp" method="post">
아이디 : <input type="text" name="userid"><br>
비밀번호 : <input type="password" name="passwd"><p>
<input type="submit" value="로그인">
<input type="reset" value="다시입력">
</form>
</body>
</html>
login_1.jsp 파일 생성)
<%@ page language="java" contentType="text/html; charset=UTF-8"
	pageEncoding="UTF-8"%>
<!DOCTYPE html>
<html>
<head>
<meta charset="UTF-8">
<title>login_1.jsp test</title>
</head>
<body>
	<h2>login test</h2>
	<%
	request.setCharacterEncoding("utf-8");
	String userid = request.getParameter("userid");
	String passwd = request.getParameter("passwd");
	%>
	<%
	if (userid.equals("")) {
	%>
	<jsp:include page="loginhandle.jsp">
		<jsp:param value="guest" name="userid" />
		<jsp:param value="anonymous" name="passwd" />
	</jsp:include>
	<%
	} else {
	%>
	<jsp:include page="loginhandle.jsp" />
	<%
	}
	%>
</body>
</html>
loginhandle.jsp 파일 생성)
<%@ page language="java" contentType="text/html; charset=UTF-8"
    pageEncoding="UTF-8"%>
<!DOCTYPE html>
<html>
<head>
<meta charset="UTF-8">
<title>loginhandle.jsp test</title>
</head>
<body>
<%
	request.setCharacterEncoding("utf-8");

	String userid= request.getParameter("userid");
	String passwd= request.getParameter("passwd");
%>
<%
	if(userid.equals("guest")){
		out.println("회원이 아닙니다.<br>");
		out.println("회원가입을 하시기 바랍니다.<hr size='5' color='red'>");
	}else{
		out.println(userid+"님 로그인 완료<hr size='5' color='green'");
	}
%>
<p><p>
아이디 :<%=userid %>
비밀번호 : <%=passwd %>
</body>
</html>
↓결과

<예시_3>
forward_1.jsp 파일 생성)
<%@ page language="java" contentType="text/html; charset=UTF-8"
pageEncoding="UTF-8"%>
<!DOCTYPE html>
<html>
<head>
<meta charset="UTF-8">
<title>forward test</title>
</head>
<body>
<h2>접속 할 사이트 입력</h2>
<form action="forward_2.jsp" method="post" name="test">
URL : <input type="text" name="url">
<input type="submit" value="보내기">
</form>
</body>
</html>
forward_2.jsp 파일 생성)
<%@ page language="java" contentType="text/html; charset=UTF-8"
	pageEncoding="UTF-8"%>
<!DOCTYPE html>
<html>
<head>
<meta charset="UTF-8">
<title>forward_2.jsp test</title>
</head>
<body>
	<jsp:forward page="send.jsp" />
</body>
</html>
send.jsp 파일 생성)
<%@ page language="java" contentType="text/html; charset=UTF-8"
    pageEncoding="UTF-8"%>
<!DOCTYPE html>
<html>
<head>
<meta charset="UTF-8">
<title>forward test send.jsp test</title>
</head>
<body>
<% response.sendRedirect("http://"+request.getParameter("url")); %>
</body>
</html>
↓결과

<예시_4>
<%@ page language="java" contentType="text/html; charset=UTF-8"
    pageEncoding="UTF-8"%>
<!DOCTYPE html>
<html>
<head>
<meta charset="UTF-8">
<title>forwardmain.jsp test</title>
</head>
<body>
<h2>forward 액션태그</h2>
forwardMain.jsp 파일 시작부분입니다.<br>
forward 태그는 페이지 속성에 지정된 파일로 제어를 넘깁니다.<br>
forwardMain.jsp 페이지의 출력 내용은 출력되지 않습니다.<br>

<jsp:forward page="forwardsub.jsp"/>
<!-- 같은 의미 -->
<%--<% pageContext.forward("forwardsub.jsp"); %>--%>

<%--<jsp:include page="forwardsub.jsp"/>--%>

<%--<% response.sendRedirect("forwardsub.jsp");%> --%>
forwardMain.jsp 파일의 끝부분입니다

</body>
</html>
forwardsub.jsp 파일 생성)
<%@ page language="java" contentType="text/html; charset=UTF-8"
    pageEncoding="UTF-8"%>
<!DOCTYPE html>
<html>
<head>
<meta charset="UTF-8">
<title>Insert title here</title>
</head>
<body>
  <hr size="5" color="red">
   <font color="green">
      이전에 있던 forward_main.jsp의 출력은 나오지 않습니다.<br>
      이 부분이 forward 태그가 있던 자리로 forward_sub.jsp 결과만 출력 된다.<br>
      이후에 있던 forward_main.jsp도 출력 되지 않습니다.<br>
   </font>
</body>
</html>
결과1)
<jsp:forward page="forwardsub.jsp"/>
<% pageContext.forward("forwardsub.jsp"); %>

결과2)
<jsp:include page="forwardsub.jsp"/>

결과3)
<% response.sendRedirect("forwardsub.jsp");%>

<예시_5>
main_1.jsp 파일 생성)
<%@ page language="java" contentType="text/html; charset=UTF-8"
    pageEncoding="UTF-8"%>
<!DOCTYPE html>
<html>
<head>
<meta charset="UTF-8">
<title>main_1.jsp test</title>
</head>
<body>
<h2>include 액션 태그</h2>
<hr size="5" color="red">
main_1.jsp 파일 시작부분입니다.<br>
include태그는 페이지 속성 파일 결과를 태그 위치에 삽입합니다.<br>

<jsp:include page="sub_1.jsp" />
<hr size="5" color="green">
</body>
</html>
sub_1.jsp 파일 생성)
<%@ page language="java" contentType="text/html; charset=UTF-8"
    pageEncoding="UTF-8"%>
<!DOCTYPE html>
<html>
<head>
<meta charset="UTF-8">
<title>sub_1.jsp test</title>
</head>
<body>
<hr size="5" color="cyan">
<font color="blue" size="13">
	이부분은 include 태그가 있던 자리로 sub_1.jsp결과가 삽입됩니다
</font>
</body>
</html>
↓결과

'JSP' 카테고리의 다른 글
| 221011_JSP_JDBC_국비_기초 (0) | 2022.10.11 |
|---|---|
| 221011_JSP_국비_자바빈즈2 (0) | 2022.10.11 |
| 221010_JSP_국비_session/ cookie/ 자바빈즈 (0) | 2022.10.10 |
| 221005_JSP_국비_Directive/ Implicit Object/ request (1) | 2022.10.05 |
| 221004_JSP_국비_JSP엔진/ 기본문법/ 실행/ 라이프사이클 (1) | 2022.10.04 |


