<예시_1>
<!DOCTYPE html>
<html>
<head>
<meta charset="UTF-8">
<title>onbeforeprint, onafterprint</title>
<style>
#logoDiv {
display: none;
position: absolute;
left: 0;
top: 0;
width: 100%;
height: 100%;
}
</style>
<script>
window.onbeforeprint = function (e) {
logoDiv = document.getElementById("logoDiv");
logoDiv.style.display = "block";//block으로 변경, 로고가 화면에 나타나게함
}
window.onafterprint = hideLogo;
function hideLogo() {
logoDiv = document.getElementById("logdDiv");
logoDiv.style.display = "none"; //<div>영역이 보이지 않게함
logoDiv.style.zIndex = -1; //이미지 문서의 제일 밑으로 배치
}
</script>
</head>
<body>
<h3>onbeforeprint, onafterprint</h3>
<hr>
<div id="logoDiv">
<img src="../images/logo.png" alt="이미지 없습니다_1">
</div>
</div>
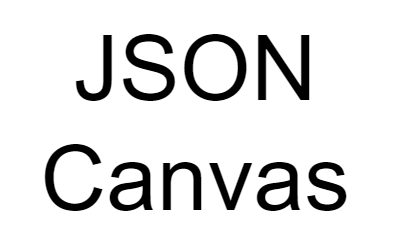
<p>
브라우저 윈도우에서는 보이지 않지만, 프린트시 로고가 출력되는 예제입니다.
오른쪽 버튼을 눌러 인쇄 미리보기 메뉴를 선택해보세요
</p>
</body>
</html>onbeforeprint : 인쇄모드 인쇄대화상자 나타나기 전
onafterprint : 인쇄대화상자에서 인쇄버튼 클릭해 인쇄시작 또는 인쇄대화상자 종료시 이벤트 발생
↓결과
JSON객체
- 클라이언트와 서버의 통신에서 데이터를 주고 받을 때 주로 이용
- lightweight(저중량) 데이터를 교환하는 형식으로 컴퓨터 시스템이 파싱하고 생성하기 쉽게 만들어짐
- 특징
1. javascript기반으로 만들어졌으며 특정 언어에 종속되지 않는 완벽한 도깁적은 텍스트 형식을 가지고 있음
2. 데이터는 이름(key),값(value)의 쌍으로 구성 되며 '{ }'안에 삽입
key와 value는 ':'(콜론)으로 구분
각 데이터 사이는 ','(콤마)로 구분
<예시_1>
<!DOCTYPE html>
<html>

<head>
    <meta charset="UTF-8">
    <title>json객체</title>
    <script>
        function init() {
            var emp = {
                "name": "lee",
                "age": "25",
                "tel": "010-1111-1111",
                "address": "seoul"
            };
            var msg = "";
            msg += "이름 : " + emp.name + "<br>" +
                "나이 : " + emp.age + "<br>" +
                "전화 : " + emp.tel + "<br>" +
                "주소1 : " + emp.address + "<br>" +
                "주소2 : " + emp["address"] + "<br>" +
                "주소2 : " + emp['address'] + "<br>" //값을 가져오기 위한 3가지방법이 있음

            document.getElementById("result").innerHTML = msg;
        }
    </script>
</head>

<body onload="init()">
    <h2>json표기법</h2>
    <div id="result"></div>
</body>

</html>- JON데이터 : 이름과 값의 쌍으로 구성, 이름, 콜론(:), 값의 순서로 구성
- 형식 : "데이터 이름" : "값"
배열 → 대괄호[]
json → 중괄호{}
↓결과

<예시_2>
<!DOCTYPE html>
<html>

<head>
    <meta charset="UTF-8">
    <title>json 배열</title>
    <script>
        function init() {
            var emp = [{ "name": "kim", "age": 30 },
            { "name": "lee", "age": 24 },
            { "name": "park", "age": 20 },
            ];
            var msg = "";
            msg += "이름 : " + emp[0].name + "<br>나이 : " + emp[0].age + "<br><br>";
            msg += "이름 : " + emp[1].name + "<br>나이 : " + emp[1].age + "<br><br>";
            msg += "이름 : " + emp[2].name + "<br>나이 : " + emp[2].age + "<br><br>";
            msg += "이름 : " + emp[2]["name"] + "<br>나이 : " + emp[2]["age+"] + "<br><br>";
            document.getElementById("result").innerHTML = msg;
        }
    </script>
</head>

<body onload="init()">
    <h2>json표기법</h2>
    <div id="result"></div>

</body>

</html>
↓결과

<예시_3>
<!DOCTYPE html>
<html>
<head>
<meta charset="UTF-8">
<title>json login</title>
<script>
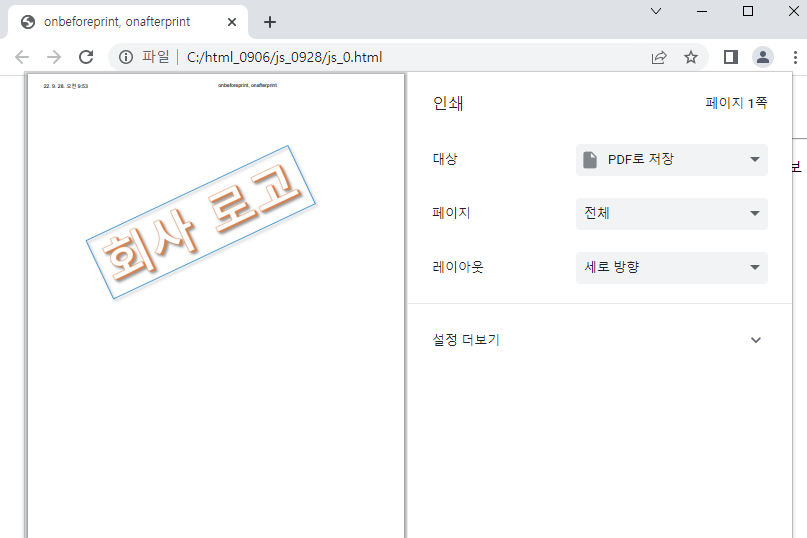
var emp = {
"id": "lee111",
"pw": "1234",
"name": "lee",
"point": "3456"
};
function login() {
var a = document.getElementById("id").value;
var b = document.getElementById("pw").value;
if (emp.id == a && emp.pw == b)
document.getElementById("confirm").innerHTML
= "<br><span style='color : red'>" + emp["name"]
+ "로그인 완료<br> 현재 포인트 : " + emp['point'] + "</span>";
else
document.getElementById("confirm").innerHTML
= "<span style='color: blue'>아이디 또는 비밀번호가 틀립니다"
}
</script>
</head>
<body>
<label for="input">[로그인화면]</label><br><br>
<input type="text" id="id"><span>아이디 입력</span><br>
<input type="text" id="pw"><span>비밀번호 입력</span><br>
<button id="log" onclick="login()">Login</button>
<span id="confirm"></span>
</body>
</html>
↓결과
<location_예시_1>
js_4.html 파일 생성)
<!DOCTYPE html>
<html>
<head>
<meta charset="UTF-8">
<title>location 객체</title>
<script>
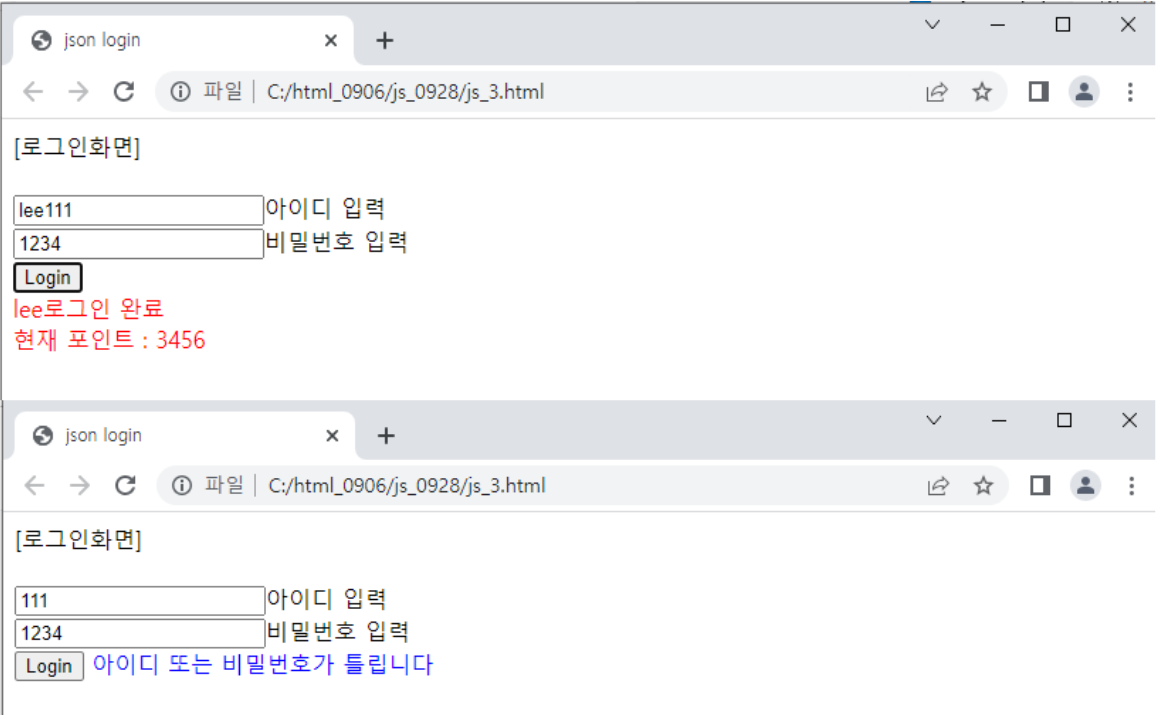
function process() {
var naem = frm.name.value;
var phone = frm.phone.value;
location.href = "win_2.html?" + name + "&" + phone;//?와&로 문자열 구분
}
</script>
</head>
<body>
<form name="frm">
사용자명 : <input type="text" name="name"><br>
전화번호 : <input type="text" name="phone"><br>
<input type="button" onclick="process()" value="전송">
</form>
</body>
</html>
win_2.html 파일 생성)
<!DOCTYPE html>
<html>

<head>
    <meta charset="UTF-8">
    <title>location객체</title>
    <script>
        document.write("주소 : " + location.href + "<br>");
        document.write("프로토콜 : " + location.protocol + "<br>");
        document.write("호스트 : " + location.host + "<br>");
        document.write("파일 경로명 : " + location.pathname + "<br>");
        document.write("검색 : " + location.search + "<br>");
    </script>

</head>

<body>

</body>

</html>
location.href
- 현재 접속중인 페이지 정보를 가지고 있음
- 값을 변경 할 수 있는 프로퍼티이기때문에 다른 페이지로 이동하는데 사용됨
- 형식 : location.href="이동 할 페이지 주소"
- 현재 페이지 확인 방법 : location.href;
↓결과
HTML5 와 Canvas
- <canvas>태그로 브라우저 화면상 할당된 공간에서 이루어짐
- 캔버스의 그래픽 그리기는 자바스크립트 코드로만 가능
- 형식 : <canvas id="캔버스 객체 id"
style = "CSS3 스타일 시트"
width = "캔버스 영역의 너비"
height = "캔버스 영역의 높이">
이 태그를 지원하지 않는 브라우저가 출력할 html 텍스트
</canvas>
- width, height : 생략가능, 디폴트값 각각 300px,150px - 캔버스 그리기 2가지 유형
1. beginPath() : 빈 경로 생성 → 경로(path)에 선, 원, 사각형을 모아놓음 → 한번에 캔버스에 그림을 그림
2. 경로에 담지않고 바로 캔버스에 그림 - 메소드
| 메소드종류 | 의미 | 비고 |
| beginPath() | 이전 경로를 모두 삭제하고 새로 시작 | 경로와 관련 |
| closePath() | 경로의 끝과 시작점을 연결하는 선을 추가하고 경로를 닫음 |
경로와 관련 |
| moveTo() | 경로에 새 점 생성 | 경로와 관련 |
| lineTo() | 경로의 끝 점과 연결하는 선 추가 | 경로와 관련 |
| rect() | 경로에 사각형 추가 | 경로와 관련 |
| arc() | 경로에 원호 추가 | 경로와 관련 |
| fill() | 경로에 만들어진 모든 도형(사각형 원호)을 외곽선 없이 내부만 색으로 채워 캔버스 생성 |
경로에 있는 도형 캔버스 그리기 |
| stroke() | 경로에 담겨 있는 모든 도형을 외곽선만 캔버스에 생성 |
경로에 있는 도형 캔버스 그리기 |
| clearRect() | 캔버스에서 사각형 영역을 채움 | 캔버스에 바로 그리기 |
| fillRect() | 캔버스에 외곽선 없이 사각형 영역을 색으로 바로 칠함 |
캔버스에 바로 그리기 |
| strokeRect() | 사각형을 경로에 추가하지 않고 캔버스에 바로 그림 |
캔버스에 바로 그리기 |
| strodeText() | 텍스트(문자열)를 캔버스에 바로 그림 | 캔버스에 바로 그리기 |
| drawImage() | 이미지를 캔버스에 바로 그림 | 캔버스에 바로 그리기 |
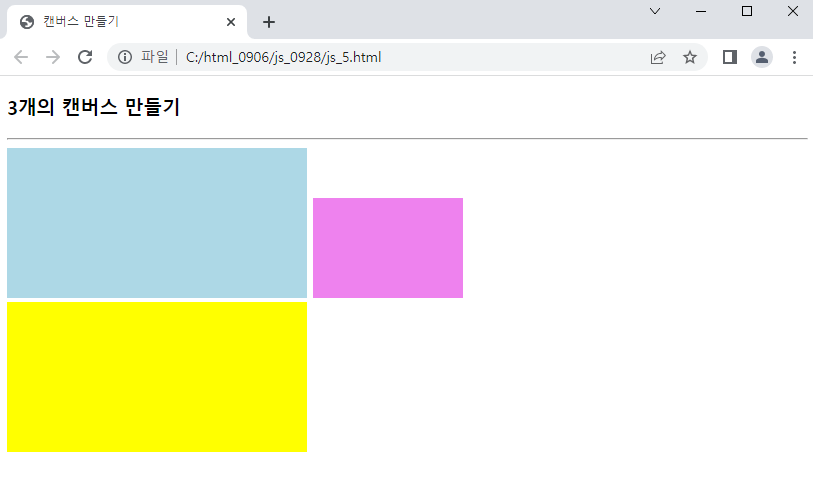
<예시_1>
<!DOCTYPE html>
<html>

<head>
    <meta charset="UTF-8">
    <title>캔버스 만들기</title>

</head>

<body>
    <h3>3개의 캔버스 만들기</h3>
    <hr>
    <canvas id="canvas1" style="background-color: lightblue;"></canvas>
    <canvas id="canvas1" style="background-color: violet;" width="150" height="100"></canvas><br>
    <canvas id="canvas1" style="background-color: yellow;" width="300" height="150"></canvas><br>
</body>

</html>
↓결과
<예시_2>
<!DOCTYPE html>
<html>

<head>
    <meta charset="UTF-8">
    <title>캔버스 그리기</title>

</head>

<body>
    <h3>캔버스 그리기</h3>
    <hr>
    <canvas id="myCanvas" style="background-color: aliceblue;" width="250" height="150">
    </canvas>
    <script>
        var canvas = document.getElementById("myCanvas");
        var context = canvas.getContext("2d");

        // 파란선으로 사각형 그리기
        context.beginPath(); //빈경로 만들기
        context.strokeStyle = "blue"; //선 색 설정
        context.rect(30, 30, 50, 50,);  //(30,30)에서 50x50 크기 사각형을 경로에 삽입
        context.stroke(); //경로에 있는 모든 도형의 외곽선 그리기

        // violet으로 사각형 그리기
        context.beginPath(); //빈경로 만들기
        context.fillStyle = "violet"; //선 색 설정
        context.rect(60, 60, 50, 50,);  //(60,60)에서 50x50 크기 사각형을 경로에 삽입
        context.fill(); //경로에 있는 모든 도형의 외곽선 그리기

        // green으로 사각형 그리기
        context.font = "20px Gothic"
        context.fillStyle = "green"; //채우기 색
        context.fillText("Text in Canvas", 100, 50); //텍스트를 경로에 넣지 않고 바로 그리기

    </script>

</body>

</html>
- getContext("2d") : 리턴한 객체는 2차원 그래픽에 사용되는 프로퍼티와 메소드를 가진
CanvasRenderingContext2D타입 객체,context라고 부르기도함 - 캔버스 : 2차, 3차 모두 지원
2차원 : canvas.getContext("2d")
3차원 : canvas.getContext("web1")
web1 : Web Graphics Library는 플러그인 도움없이 브라우저를 막론하고
2D,3D차원의 그래픽을 지원하는 자바스크립트 API
getContext : 캔버스에 그림을 그리는 컨텍스트 객체 리턴
↓결과

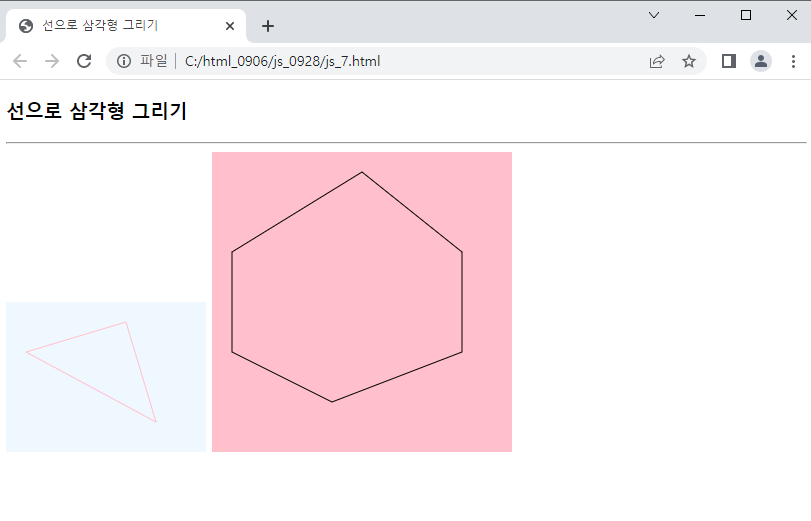
<예시_3>
<!DOCTYPE html>
<html>

<head>
    <meta charset="UTF-8">
    <title>선으로 삼각형 그리기</title>

</head>

<body>
    <h3>선으로 삼각형 그리기</h3>
    <hr>
    <canvas id="myCanvas" style="background-color: aliceblue;" width="200" height="150">
        <br>

    </canvas>
    <script>
        var canvas = document.getElementById("myCanvas");
        var context = canvas.getContext("2d");

        context.beginPath(); //빈경로 만들기
        context.moveTo(120, 20); //(120,20)을 시작점으로 설정
        context.lineTo(20, 50); //경로에 (120,20)에서 (20,50)까지 직선 추가
        context.lineTo(150, 120); //경로에 (20,50)에서 (150,120)까지 직선 추가
        context.lineTo(120, 20); //경로에 (150,120)에서 (120,20)까지 직선 추가
        context.strokeStyle = "pink"; //선의 색
        context.stroke(); //경로를 캔버스에 그림
    </script>
    <canvas id="myCanvas1" style="background-color: pink;" width="300" height="300">
        <script>

            var canvas1 = document.getElementById("myCanvas1");
            var context1 = canvas1.getContext("2d");

            context1.beginPath();
            context1.moveTo(150, 20);
            context1.lineTo(20, 100);
            context1.lineTo(20, 200);
            context1.lineTo(120, 250);
            context1.lineTo(250, 200);
            context1.lineTo(250, 100);
            context1.lineTo(150, 20);
            context1.strokeStyle = "black"; //선의 색
            context1.stroke(); //경로를 캔버스에 그림

        </script>
</body>

</html>
↓결과
<예시_4>
<!DOCTYPE html>
<html>

<head>
    <meta charset="UTF-8">
    <title>사각형 그리기</title>

</head>

<body>
    <h3>사각형 그리기</h3>
    <hr>
    <canvas id="myCanvas" style="background-color: aliceblue;" width="200" height="150"></canvas>
    <script>
        var canvas = document.getElementById("myCanvas");
        var context = canvas.getContext("2d");

        context.beginPath(); //빈경로 구성
        for (var i = 0; i < 5; i++) {
            context.rect(10 + i * 30, 10 + i * 15, 50, 50,);
             //context.rect(150 - i * 30, 10 + i * 15, 50, 50,); //오른쪽위에서 왼쪽 아래를 향하게
        }
        context.strokeStyle = "pink"; //선의 색
        context.stroke(); //사각형을 캔버스에 그림
    </script>
</body>

</html>
↓결과
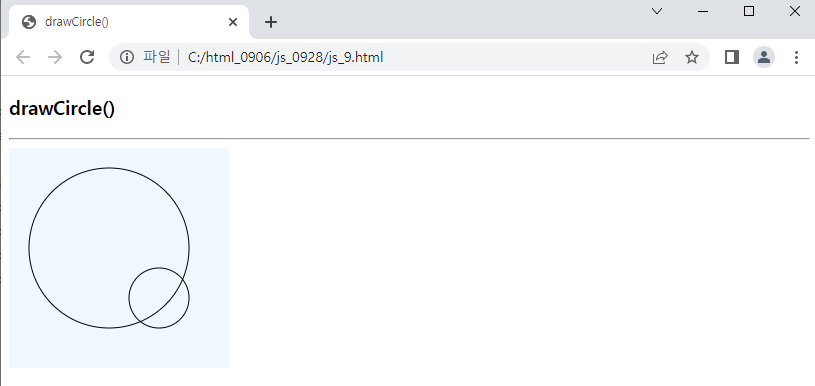
<예시_5>
<!DOCTYPE html>
<html>

<head>
    <meta charset="UTF-8">
    <title>drawCircle()</title>
    <script>
        function drawCircle(ctx, x, y, radius) {
            ctx.beginPath();
            ctx.arc(x, y, radius, 0, 2 * Math.PI);
            //2* Mat.PI = 360도
            ctx.stroke();
        }

    </script>
</head>

<body>
    <h3>drawCircle()</h3>
    <hr>
    <canvas id="myCanvas" width="220" height="220" style="background-color: aliceblue;"></canvas>
    <script>
        var canvas = document.getElementById("myCanvas");
        var context = canvas.getContext("2d");
        drawCircle(context, 100, 100, 80);
        drawCircle(context, 150, 150, 30);
    </script>
</body>

</html>
arc(x,y,반지름, 시작각도, 끝각도, 방향설정)
방향설정 : false(기본값) → 시계방향, true → 반시계방향
↓결과
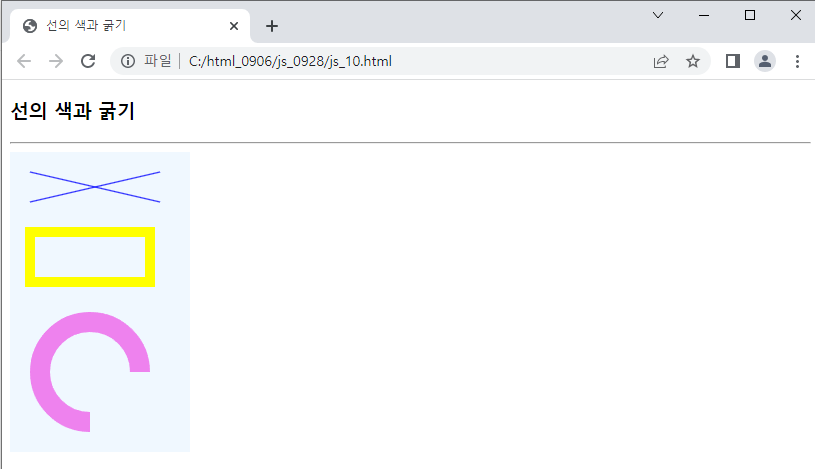
<예시_6>
<!DOCTYPE html>
<html>

<head>
    <meta charset="UTF-8">
    <title>선의 색과 굵기</title>

</head>

<body>
    <h3>선의 색과 굵기</h3>
    <hr>
    <canvas id="myCanvas" style="background-color: aliceblue;" width="180" height="300"></canvas>
    <script>
        var canvas = document.getElementById("myCanvas");
        var context = canvas.getContext("2d");

        //1px blue 직선 그리기
        context.beginPath();
        context.moveTo(20, 20);
        context.lineTo(150, 50);
        context.strokeStyle = "blue";
        context.stroke();

        context.beginPath();
        context.moveTo(150, 20);
        context.lineTo(20, 50);
        context.strokeStyle = "blue";
        context.stroke();

        //10px yellow 사각형 그리기
        context.beginPath();
        context.rect(20, 80, 120, 50);
        context.lineWidth = 10; //선 굵기 10px
        context.strokeStyle = "yellow";
        context.stroke();

        //20px violet 원호 그리기
        context.beginPath();
        context.arc(80, 220, 50, 0.5 * Math.PI, false);//0.5*Math.PI /2 :90, 3시방향
        context.lineWidth = 20; //선 굵기 20px
        context.strokeStyle = "violet";
        context.stroke();
    </script>
</body>

</html>
↓결과
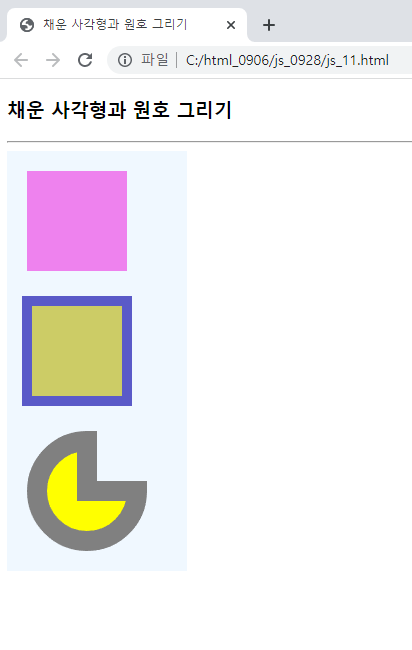
<예시_7>
<!DOCTYPE html>
<html>

<head>
    <meta charset="UTF-8">
    <title>채운 사각형과 원호 그리기</title>

</head>

<body>
    <h3>채운 사각형과 원호 그리기</h3>
    <hr>
    <canvas id="myCanvas" style="background-color: aliceblue;" width="180" height="420"></canvas>
    <script>
        var canvas = document.getElementById("myCanvas");
        var context = canvas.getContext("2d");

        //fillRect()로 외곽선없이 색으로 채운 사각형 그리기
        context.fillStyle = "violet";
        context.fillRect(20, 20, 100, 100);//채운 사각형 그리기

        //fill()로 사각형 내부 칠하기
        context.beginPath();
        context.rect(20, 150, 100, 100); //경로에 사각형 삽입
        context.fillStyle = "#cccc66";
        context.fill(); //사각형 내부 칠하기

        //사각형 외곽선 그리기
        context.strokeStyle = "rgb(90,90,200)";
        context.lineWidth = 10;
        context.stroke(); //사각형 외곽선 그리기

        //fill()로 원호 내부 칠하기
        context.beginPath();
        context.moveTo(80, 340); //원호 중심을 시작점으로 설정
        context.arc(80, 340, 50, 0, 1.5 * Math.PI); //경로에 원호 삽입
        context.closePath(); //원호의 끝점과 경로 시작점(원호중심)을 연결하는 직선 자동 추가
        context.fillStyle = "yellow";
        context.fill(); //원호 내부 칠하기

        //원호 외곽선 그리기
        context.strokeStyle = "gray";
        context.lineWidth = 20;
        context.stroke(); //원호 외곽선 그리기
    </script>
</body>

</html>
↓결과
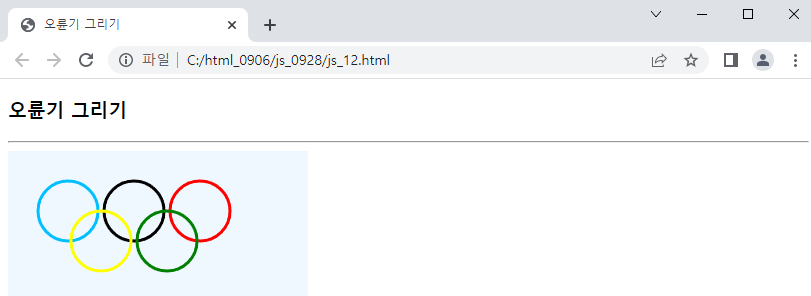
<예시_8>
<!DOCTYPE html>
<html>

<head>
    <meta charset="UTF-8">
    <title>오륜기 그리기</title>
    <script>
        function drawCircle(ctx, x, y, radius, color) {
            ctx.beginPath();
            ctx.arc(x, y, radius, 0, 2 * Math.PI);
            ctx.lineWidth = 3;
            ctx.strokeStyle = color;
            ctx.stroke();
        }
        function drawCircleRings(ctx, xArray, yArray) {
            var startX = 60;
            var startY = 60;
            var radius = 30;

            var colors = ["deepskyblue", "black", "red", "yellow", "green"];
            var x = startX;
            var y = startY;
            var gap = 6;
            for (i = 0; i < 3; i++) { //위에 있는 3개의 원 생성
                drawCircle(ctx, x, y, radius, colors[i]);
                x += radius * 2 + gap; //원의 지름 길이
            }
            x = startX + radius + gap / 2;
            y = startY + radius;
            for (j = i; j < 5; j++) { //밑에 있는 2개의 원 생성
                drawCircle(ctx, x, y, radius, colors[j]);
                x += radius * 2 + gap;
            }
        }

    </script>
</head>

<body>
    <h3>오륜기 그리기</h3>
    <hr>
    <canvas id="myCanvas" width="300" height="150" style="background-color: aliceblue;"></canvas>
    <script>
        var canvas = document.getElementById("myCanvas");
        var context = canvas.getContext("2d");
        drawCircleRings(context);
    </script>
</body>

</html>
↓결과
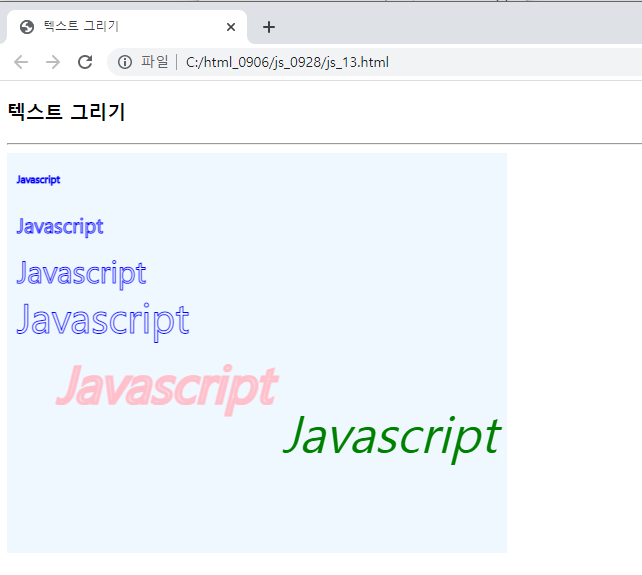
<예시_9>
<!DOCTYPE html>
<html>

<head>
    <meta charset="UTF-8">
    <title>텍스트 그리기</title>

</head>

<body>
    <h3>텍스트 그리기</h3>
    <hr>
    <canvas id="myCanvas" style="background-color: aliceblue;" width="500" height="400"></canvas>
    <script>
        var canvas = document.getElementById("myCanvas");
        var context = canvas.getContext("2d");
        context.strokeStyle = "blue";

        //font 프로퍼티 활용
        for (var i = 0; i < 4; i++) {
            context.font = (10 + i * 10) + "px forte";
            context.strokeText("Javascript", 10, 30 + i * 50);
        }

        //텍스트 외곽선 그리기
        context.font = "italic 50px forte";
        context.strokeStyle = "pink";
        context.lineWidth = 3;
        context.textAlign = "left";
        context.strokeText("Javascript", 50, 250);

        //텍스트 채워 그리기
        context.fillStyle = "green";
        context.textAlign = "right";
        context.fillText("Javascript", 490, 300);
    </script>
</body>

</html>- pixel(px) : 고정된 크기 단위( 주로 컴퓨터 화면에 사용됨), 크기 조정 불가능
- point(pt) : 고정된 크기 단위(주로 인쇄 매체에서 사용), 크기 조정 불가능
- em : 웹 문서에서 사용되는 단위, 컴퓨터와 모바일등 다른 장치에서도 사용가능, 크기 조정 가능
1em =12pt =16px - persent(%) :em과 비슷하게 다른 장치에 상대성적으로 크기 조정가능
↓결과
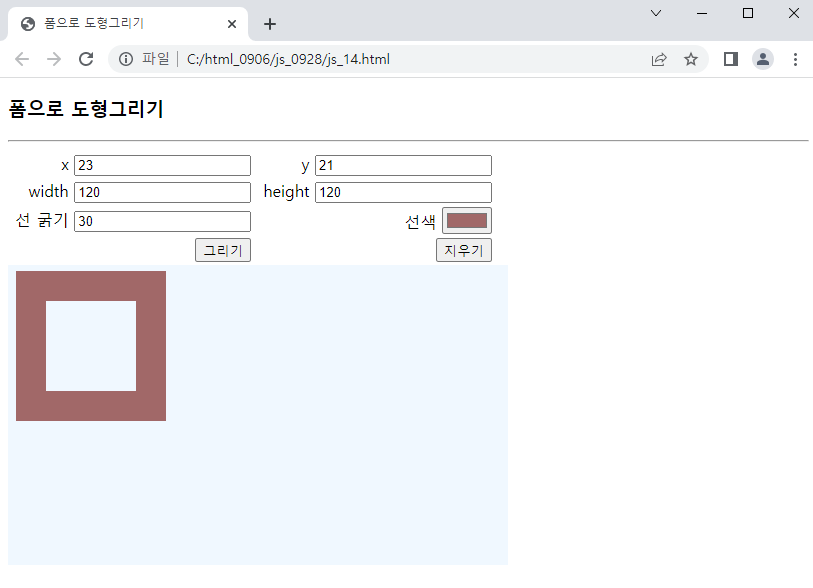
<예시_10>
<!DOCTYPE html>
<html>

<head>
    <meta charset="UTF-8">
    <title>폼으로 도형그리기</title>
    <style>
        td {
            text-align: right;
            padding-left: 5px;
            padding-right: 5px;
        }
    </style>
    <script>
        function draw() {
            var canvas = document.getElementById("myCanvas");
            var context = canvas.getContext("2d");

            var x = document.getElementById("x").value;
            var y = document.getElementById("y").value;
            var width = document.getElementById("width").value;
            var height = document.getElementById("height").value;
            var lineWidth = document.getElementById("lineWidth").value;
            var strokeStyle = document.getElementById("strokeStyle").value;
            context.beginPath();
            context.rect(x, y, width, height);
            context.lineWidth = lineWidth;
            context.strokeStyle = strokeStyle;
            context.stroke();
        }
        function erase() {
            var canvas = document.getElementById("myCanvas");
            var context = canvas.getContext("2d");
            context.clearRect(0, 0, canvas.width, canvas.height);
        }
    </script>
</head>

<body>
    <h3>폼으로 도형그리기</h3>
    <hr>
    <form>
        <table>
            <tr>
                <td><label>x <input type="number" id="x" value="10"></label></td>
                <td><label>y <input type="number" id="y" value="10"></label></td>
            </tr>
            <tr>
                <td><label>width <input type="number" id="width" value="120"></label></td>
                <td><label>height <input type="number" id="height" value="120"></label></td>
            </tr>
            <tr>
                <td><label>선 굵기 <input type="lineWidth" id="lineWidth" value="1"></label></td>
                <td><label>선색 <input type="color" id="strokeStyle" value="#000000"></label></td>
            </tr>
            <tr>
                <td><label><button type="button" onclick="draw()">그리기</button></label></td>
                <td><button type="button" onclick="erase()">지우기</button></td>
            </tr>
        </table>
    </form>
    <canvas id="myCanvas" width="500" height="300" style="background-color: aliceblue;"></canvas>
</body>

</html>
↓결과
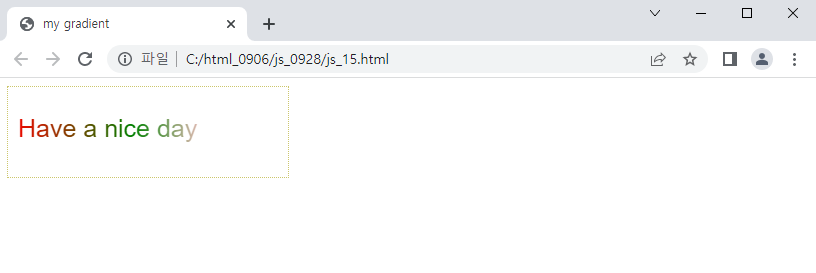
<예시_11>
<!DOCTYPE html>
<html>

<head>
    <meta charset="UTF-8">
    <title>my gradient</title>

</head>

<body>
    <canvas id="myCanvas" width="280" height="90" style="border: 1px dotted #ccc66c;"></canvas>
    <script>
        var c = document.getElementById("myCanvas");
        var ctx = c.getContext("2d");

        var grd = ctx.createLinearGradient(0, 0, 250, 0);
        grd.addColorStop(0, "red");
        grd.addColorStop("0.5", "green");
        grd.addColorStop("0.8", "pink");
        grd.addColorStop(1, "black");
        ctx.fillStyle = grd;
        ctx.font = "25px Arial";
        ctx.fillText("Have a nice day", 10, 50);

    </script>
</body>
</html>- createLinearGradient(시작 점x1, 시작점 y1, 끝점x2,끝점 y2)
- x1,y1 : 그라디언트를 적용할 면의 시작 축 좌표
- x2,y2 : 그라디언트를 적용할 면의 종료 축 좌표
→ 선형 그라데이션 지정 - createRadialGradient(x1,y1, 첫번째 원의 반지름 r1,r2,y2, 두번쨰 원의 반지름 r2)
→ 원형 그라데이션 지정 - addColorStop(오프셋, 색상)
- 오프셋 : 0.0~1.0까지의 색상의 상대적 위치
→ 그라데이션 경계색 지정
↓결과
<예시_12>
<!DOCTYPE html>
<html>

<head>
    <meta charset="UTF-8">
    <title>gradient Test</title>

</head>

<body>
    <canvas id="myCanvas1" width="200" height="100"></canvas>
    <canvas id="myCanvas2" width="200" height="100"></canvas>
    <canvas id="myCanvas3" width="200" height="100"></canvas>

    <script>
        var c = document.getElementById("myCanvas1");
        var ctx = c.getContext("2d");

        //Create gradient
        var grd = ctx.createLinearGradient(0, 0, 160, 0);
        grd.addColorStop(0, "blue");
        grd.addColorStop(0.5, "cyan");
        grd.addColorStop(1, "white");

        //Fill with gradient
        ctx.fillStyle = grd;
        ctx.fillRect(10, 10, 150, 80);

        //----------------------------------------
        var c = document.getElementById("myCanvas2");
        var ctx = c.getContext("2d");

        //Create gradient
        var grd = ctx.createRadialGradient(75, 30, 5, 75, 30, 100);
        grd.addColorStop(0, "red");
        grd.addColorStop(0.5, "green");
        grd.addColorStop(1, "white");
        //addColorStop() : 그라데이션 객체의 색상과 위치 지정

        //Fill with gradient
        ctx.fillStyle = grd;
        ctx.fillRect(10, 10, 150, 80);

        //----------------------------------------
        var c = document.getElementById("myCanvas3");
        var ctx = c.getContext("2d");

        //Create gradient
        var grd = ctx.createLinearGradient(170, 0, 0, 80);
        grd.addColorStop(0, "black");
        grd.addColorStop(0.3, "pink");
        grd.addColorStop(0.5, "blue");
        grd.addColorStop(0.8, "yellow");
        grd.addColorStop(1, "red");

        //Fill with gradient
        ctx.fillStyle = grd;
        ctx.fillRect(10, 10, 150, 80);
    </script>
</body>

</html>
↓결과
'UI > JavaScript' 카테고리의 다른 글
| 221020_JavaScript_JQUERY_국비_selector/ attribute (0) | 2022.10.20 |
|---|---|
| 220929_JavaScript_국비_Image Loading/Mouse Event /localStorage/ sessionStorage (1) | 2022.09.29 |
| 220927_JavaScript_국비_BOM2 (0) | 2022.09.27 |
| 220926_JavaScript_국비_BOM (1) | 2022.09.26 |
| 220923_JavaScript_국비_DOM2 (2) | 2022.09.23 |


